Monday 30 May 2022

Uniquely Artistic Lovely & Lasting Birthday Card - Creative Colour Challenges - #CCC39

 Good Morning Everyone

Happy Monday, I hope you had a fabulous weekend and are ready to dive right in to a new week.

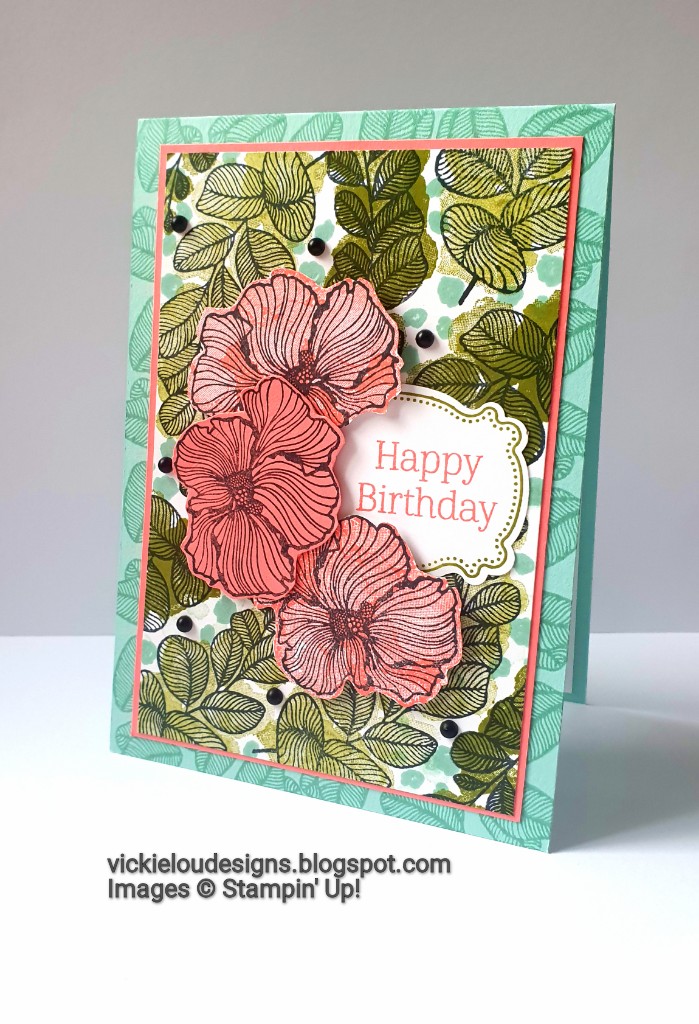
As it's Monday, it's time to share my card for this week's Brand New Combo over on Creative Colour Challenges. 

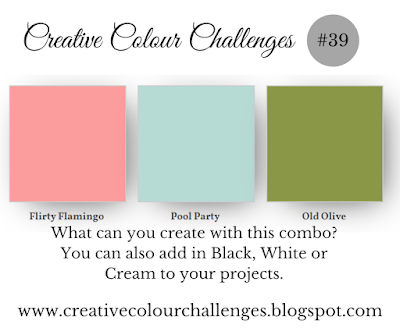
I love the combination of Flirty Flamingo, Pool Party & Old Olive. My card is quite Busy, but I love how it turned out - the Uniquely Artistic Stamp set created some awesome imagery and the sentiment label is from the Lovely & Lasting bundle which I think work really well together.


Measurements

Pool Party Card Stock

1pc - 4 1/8" x 11 3/4", scored at 5 7/8"

Flirty Flamingo Card Stock

1pc - 5 3/8" x 3 5/8"

1pc - scrap

Basic White Card Stock

1pc - 5 5/8" x 3 7/8"

1pc - 5 1/4" x 3 1/2"

1pc - scraps

-----------------------------------

Take the Pool Party card stock and fold along the score to create your card base. Ink up the small outline leaf in Pool Part ink and stamp all around the edges of the card front. Then add the larger piece of Basic white to the inside.

Ink up the larger leaf outline stamp in memento and cover the remaining piece of basic white. Once dry use the solid in fill stamp to colour the leaves in Old Olive ink. I used both 1st Generation and 2nd Generation (stamped off once) stamping to created two tones. Add the small cluster of dots in some of the White spaces using Pool Party ink.

Layer this piece to the flirty flamingo card stock and add to the centre of the card front.

Using the Lovely & Lasting stamp set, stamp the label outline in Old Olive ink and add the sentiment in Flirty Flamingo - stamping the over to the right hand side.

Add this label to the card front, roughly in the centre, but off the the right.

On a scrap of flirty flamingo card stock, stamp the flower head outline in memento. Also stamp two onto basic white. Use the solid in fill on the Basic white flowers and colour with flirty flamingo ink. Fussy cut all three images out. Add these to the left of the label  with dimensionals.

Finally add some of the matte black dots.

I really hope you have enjoyed my project today, if you would like to know more about Creative Colour Challenges, or wish to join in head over to my blog Creative Colour Challenges, I would love to see what you could create with these colours

Here's a list of supplies I used in today's project, click on the images to head over to my online store Product List


If you are on Facebook, why not pop over and check out our community group Craft & Banter. If you have a passion for paper craft, are brilliant at baking or a super talented seamstress then we would love to see you there. We share all types of crafting, run challenges and giveaways & generally have a right good natter.

See you soon 

Vickie 

Xxx

Sunday 29 May 2022

Hues of Happiness Lovely & Lasting 4x4" Thank You Note Cards. Crafty Collaborations Share it Sunday. May 2022

 Good Afternoon Everyone

Today I'm taking part in the Crafty Collaborations Share it Sunday Blog Hop, where we don;t have a set theme, we just all share a project that we have made.

I wanted to share a super simple card with you today. I made a bunch of these as Thank You cards to add to my stash. I keep a pile of Thank You cards ready to go, as I always need them for one reason or another. 

I decided to dial it right back with the design on these, one to save time, but secondly to show how amazing our DSP is and that sometimes you can just let the DSP do the work for you! 

Plus you can use minimal supplies. from one sheet of 12 x12 card stock you can get 4 bases, and from one sheet of DSP you can get 9 mat layers adding in a few scraps for the sentiment. 


Measurements - Per Card

Basic White Card Stock

1pc - 4" x 8", scored at 4"

scraps

Hues of Happiness DSP

1pc - 3 1/2" x 3 1/2"

-----------------------------------

Create your card base by folding the basic white along the score line, adding the DSP to the card front.

Stamp the label outline in Melon Mambo ink and add the centre inside with Night of Navy ink. Cut out using the lasting label punch.

Add to the card front with dimensionals.

Now, how ridiculously easy is that to make such cute cards?

Thank for taking a peek at my project today, please look at the list below and continue through the hop to get lots more crafty inspiration.

Blog Hop Index

Here's a list of supplies I used in today's project, click on the images to head over to my online store Product List


If you are on Facebook, why not pop over and check out our community group Craft & Banter. If you have a passion for paper craft, are brilliant at baking or a super talented seamstress then we would love to see you there. We share all types of crafting, run challenges and giveaways & generally have a right good natter.

See you soon 

Vickie 

Xxx

Saturday 28 May 2022

Biggest Wishes Bold Birthday Card. Ink Stamp Share Celebration Blog Hop. May 2022

 Good Afternoon Everyone

This Afternoon I'm taking part in the Ink Stamp Share Blog Hop and our theme is Celebration. I decided to create a super simple card for someone who is super fussy when it comes to everything, which can sometimes be a little tricky - not a flowery person, no frills or woo hoo's! She's into very clean lines and bold colours - so I thought this would be perfect. And it's minimal supplies, letting the colour provided most of the interest. 


Measurements

Thick Basic White Card Stock

1pc - 4 1/8" x 11 3/4", scored at 5 7/8"

Basic White Card Stock

1pc - 5 1/2" x 3 3/4"

scrap

Pacific Point Card Stock

scraps

Daffodil Delight Card Stock

scraps

Gorgeous Grape Card Stock

scraps

Sweet Sorbet Card Stock

scraps

-----------------------------

Take the Thick Basic White and fold along the score line to create your card base.

Then, with the scraps of coloured card stock - cut into thin strips between 1/4" and 1/2" wide - adhere these to the normal weigh Basic White Piece in a diagonal line. You could fill the full piece, but I liked the coloured stripe running across the card. Trim down any overhanging edges so it's all flush with the basic white behind.

Add this panel to the centre of the card front.

On scraps of basic white using the Biggest Wish stamp set, stamp the Happy in Pacific Point and Birthday in Gorgeous Grape, fussy cut and add the the centre of that striped panel.

Stamp the flowers from Sentimental Swirls onto scraps and fussy cut, creating a daffodil delight, gorgeous grape and sweet sorbet flower. Pop a rhinestone into the centre of each flower. Arrange these around the sentiment.

I hope you enjoyed my super quick but striking card today. Please take a look at the list below and continue through the hop to get lots more inspiration of our Celebration theme.

Blog Hop Index

Here's a list of supplies I used in today's project, click on the images to head over to my online store Product List


If you are on Facebook, why not pop over and check out our community group Craft & Banter. If you have a passion for paper craft, are brilliant at baking or a super talented seamstress then we would love to see you there. We share all types of crafting, run challenges and giveaways & generally have a right good natter.

See you soon 

Vickie 

Xxx

Simply Fabulous Bottled Happiness Greeting Card. Stampin Birds Showcase Blog Hop. May 2022

 Good Morning Everyone

 Today I'm Blog hopping with the Stampin' Birds, so we have a few projects to share with you, I'll share mine first and then you can click along through to see what everyone else has created today.

I decided to play with some brand new product for today's card. It's so simple to put together - but looks fabulous


Measurements

Tahitian Tide Card Stock

1pc - 4 1/8" x 11 3/4", scored 5 7/8"

scrap

Basic White Card Stock

2pc - 5 1/2" x 3 3 /4"

Starry Sky Card Stock

scrap

Orchid Oasis Card Stock

scrap

-----------------------------------------

Take the Tahitian Tide Card stock and fold along the score line to create your card base, adding one of the Basic White pieces to the inside.

stamp the sentiment from Simply Fabulous in Starry Sky ink along the top of the remaining piece of basic white.

Then, from the Bottled Happiness Stamp set ink up the flower cluster in Sweet Sorbet and add to the basic white under the sentiment. Then take the leave cluster image in Parakeet Party, line it up over the Sweet sorbet and stamp. these two together create a full bouquet,

Stamp a short bottle in Starry Sky ink onto the same coloured card stock and fussy cut. Repeat with the Orchid Oasis, and then again but with the tall bottle and Tahitian tide. You can easily fussy cut this one - but the punch coordinates with this one perfectly too

Add the two short bottles to the card front with liquid glue and the tall one with dimensionals over the top, so it looks as thought the bouquet is in the tall bottle.

I really hope you liked my card today - Please continue through the Hop to get lots more inspiration - Donna is up next, click the button to head on over to her Blog


Here's a list of supplies I used in today's project, click on the images to head over to my online store Product List


If you are on Facebook, why not pop over and check out our community group Craft & Banter. If you have a passion for paper craft, are brilliant at baking or a super talented seamstress then we would love to see you there. We share all types of crafting, run challenges and giveaways & generally have a right good natter.

See you soon 

Vickie 

Xxx

The Project Share Project - 25th April 2024

  Good Morning Everyone, Happy Thursday and welcome to The Project Share Project.  Every Thursday we will all share an individual blog post ...