Saturday 30 April 2022

Happiness Abounds Embossed Birthday Wedding Card. Stampin' Birds Showcase Blog Hop

  Good Morning Everyone

Happy Saturday - It's Stampin' Bird's Blog Hop Day! As usual we don't have a set theme - we are just sharing a project we have created. I hope you enjoy them all.

I created a card very similar to today's card a week or so ago for a blog hop where the theme was embossing. A customer of mine asked if I was able to make something similar but for a wedding card and they asked for Brown and Cream colours. So I thought I would see how that particular design would look. What do you think?


Here's the two I created side by side to show you how different they both look. I absolutely love that you can use the same design, stamp set and embossing folder- switch up the colours and sentiments and get two totally different looks!


Measurements

Early Espresso Card Stock

1pc - 4 1/8" x 11 3/4", scored at 5 7/8"

scraps

Soft Suede Card Stock

1pc - 1" x 5 3/4"

Crumb Cake Card Stock

1pc - 1" x 5 3/4"

Sahara Sand Card Stock

1pc - 1" x 5 3/4"

Very Vanilla Card Stock

1pc - 5 5/8" x 3 7/8"

scraps

------------------------------------------

Take the Early Espresso card stock and fold along the score line to create your card base, adding the Very Vanilla panel to the inside.

Line the 1" strips up so they are offset and tape together on the back with some double sided tape. 


Take this piece and dry emboss using the Pretty Flowers embossing folder and your Stampin Cut & Emboss machine. I decided to use the de-bossed side this time - which I think looks great!

Add this to the card front.

On scraps of Very Vanilla stamp the large flower and the two small flowers in Versamark and heat set with your heat tool - cut out using the coordinating dies, or they are pretty easy shapes to fussy cut. Add these onto the card front lower left side.

Take a strip of the early Espresso card stock and stamp the sentiments separately in versamark ink, sprinkle with gold embossing powder and heat set with your heat tool. Trim down and add banner tails to either side and place onto the card front with dimensionals.

I hope you have enjoyed my card today, please click the button to head over to Donna's blog to check out what she has made today


I haven't included all the products today as some of the items are not available yet, I will add them as soon as they are available - Here are the basics I used. Product List

Speaking of New Products - Do get in touch if you would like a Brand New Catalogue sending through. If you currently have a demonstrator - please contact them directly - but if you don't, I would be more than happy to pop a copy in the post to you - email me vickieloudesigns@outlook.com and we can get that arranged.


If you are on Facebook, why not pop over and check out our community group Craft & Banter. If you have a passion for paper craft, are brilliant at baking or a super talented seamstress then we would love to see you there. We share all types of crafting, run challenges and giveaways & generally have a right good natter.

See you soon 

Vickie 

Xxx

Monday 25 April 2022

Hope Your Day is on Point Cactus Cuties Card. Creative Colour Challenges - #CCC34

 Good Morning Everyone

Happy Monday - I hope you all had a fabulous weekend!

Today's card was made with this week's Creative Colour Challenges combo, which is Cajun Craze, Granny Apple Green and Blushing Bride. Now, I thought this would be a tricky combo, but after glancing at my stamp sets I thought the Cactus Cuties bundle would work perfectly!


Measurements

Cajun Craze Card Stock

1pc - 5 7/8" x 8 1/4", scored at 4 1/8"

Basic White Card Stock

1pc - 5 5/8" x 3 7/8"

scraps

Blushing Bride Card Stock

scraps

Neutrals DSP Stack - Cajun Craze

1pc - 5 5/8" x 3 7/8"

--------------------------------------------

Take the Cajun Craze card stock and fold along the score line to create your card base. Add the basic white piece to the inside and the DSP to the card front.

On scraps of Basic white stamp a selection of Cacti in Granny Apple Green ink, a few of the flowers in Blushing Bride ink and some Pots in Cajun Craze ink- I did 1st and 2nd generation to get a slight shade difference. Use the punch to cut out some of the elements, and fussy cut the rest. 

Cut out a few of the flowers using the punch and a scrap of Blushing Bride Card Stock.

Build up the Cactus images and add to the pots with a little bit of liquid glue.

On another scrap of basic white, stamp the sentiment and cut out with the tailored tag punch, also cut out a tag shape in blushing bride, Cut this piece horizontally and add the the back of the sentiment, making sure you have even trim around the top and bottom edges.

Now you just need to arrange the Cacti and the sentiment onto the card front. I used Dimensionals to stick them all down.

I hope you like my card for today, please do pop along to Creative Colour Challenges and see what it's all about, and maybe have a go yourself - I would love to see what you would do with this combination.

Here's a list of supplies I used in today's project, click on the images to head over to my online store Product List


If you are on Facebook, why not pop over and check out our community group Craft & Banter. If you have a passion for paper craft, are brilliant at baking or a super talented seamstress then we would love to see you there. We share all types of crafting, run challenges and giveaways & generally have a right good natter.

See you soon 

Vickie 

Xxx

Sunday 24 April 2022

Sweet Strawberry Thank You Card. Crafty Collaborations Share it Sunday Blog Hop. April 2022

 Good Afternoon Everyone

Happy Sunday. Today I'm taking part in the Share it Sunday blog hop from Crafty Collaborations. We don't have a set theme for this hop, we just have to share some Stampin Up creations we have been making.

I have been delving into my retiring pile and trying to get some more use out of those products that unfortunately missed the cut for the New Annual Catalogue and I love a project which helps me use up those last bits and bobs and make a dent in those scraps.

I always need Thank You cards for a variety of things, so I thought I might as well get some of these made up ready for when I need some more.


Measurements

Thick Basic White Card Stock

1pc - 4 1/8" x 11 3/4", scored at 5 7/8"

scraps

Sweet Talk DSP

1pc - 5 5/8" x 3 7/8"

1pc - 2 1/2" x 4 1/2"

Real Red Card Stock

1pc - 2 5/8" x 4 5/8"

------------------------------------

Take the Basic White card stock and fold along the score line to create your card base. Add the larger piece of DSP to the card front.

Layer the remaining piece of DSP to the Real Red card stock and add to the card front on the 'wonk' - slightly at an angle so that it creates a little bit more interest.

On scraps of Basic White, stamp the strawberries and the cap - 5 of each. I used 1st and 2nd generation (stamping off once) in Real Red for the Strawberries and Granny Apple Green for the cap.

Cut these out with the Strawberry builder punch then add the cap to the top of the strawberries.

Also on a scrap stamp the sentiment, trim and then banner tail each end.

Now, just arrange the sentiment and the strawberries over the card front.

I hope liked today's card - I love any way that I can try to make use of those scraps and last bits of things.

Please take a look at the list below and continue through the hop to get tonnes more inspiration from these talented creators.

Blog Hop Index


Here's a list of supplies I used in today's project, click on the images to head over to my online store Product List


If you are on Facebook, why not pop over and check out our community group Craft & Banter. If you have a passion for paper craft, are brilliant at baking or a super talented seamstress then we would love to see you there. We share all types of crafting, run challenges and giveaways & generally have a right good natter.

See you soon 

Vickie 

Xxx


Saturday 23 April 2022

Sunny Sentiments Purple Monotone Birthday Card using the Rubber Band Technique. InspireINK Blog Hop. April 2022

 Good Morning Everyone

Happy Saturday! I hope you are all having a good weekend so far. Today I'm Blog Hopping with the InspireINK ladies. Each month a different member chooses a theme and this month Gez has chosen Purples as a theme. Any or all off our Purple shades can be used to create a project.

I thought this was the perfect opportunity to revisit the rubber band technique. It's a fun and easy way to create a unique and fabulous background.


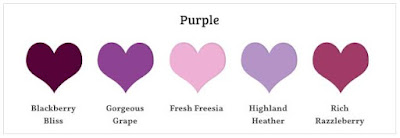
So, we currently have the following purple shades in our colour collection, there's quite a few - I decided to use all of these except Blackberry Bliss as I thought that might be a bit too dark for the look I was after.


Measurements

Rich Razzleberry Card Stock

1pc - 4 1/8" x 11 3/4", scored at 5 7/8"

1pc - scrap

Fresh Freesia Card Stock

scrap

Highland Heather Card Stock

scrap

Basic White Card Stock

2pc - 5 5/8" x 3 7/8"

scrap

----------------------------------------

Take the Rich Razzleberry Card stock and fold along the score line to create your card base, add one of the Basic White Pieces to the inside.

Grab a hand full of rubber bands and wrap them around a clear block. There's no particular way to this just fill the block as much or as little as you wish - the more you add the closer your lines, the less you add the more spaced your lines become.


Now, use this block as your stamping tool. Add ink the the rubber bands, then stamp onto your card stock all. Start Will the lightest colour, and work out to the darkest. I used a baby wipe between colours, just to take off as much surface ink from the bands so that I wasn't getting much 'other' colour on my ink pads. Keep going until you build up the required effect.

TIP - to remove the rubber bands - hold the block over the bin and snip then off the block. This will help keep inky fingers to a minimum! haha

Add the background panel to the card front.

Stamp the Sentiment from Sunny Sentiments in Gorgeous Grape ink, then run through your Mini Cut and Emboss Machine with the largest Hexagon from Beautiful Shapes Dies. Layer this to a scrap of Rich Razzelberry card stock and trim down to give a nice even border of colour. Add this to the centre of the card front with dimensionals.

On scraps of Fresh Freesia stamp the larger flower from Sentimental Swirls in Fresh Freesia ink and cut out using the Flowers & Leaves punch. 

Also cut out the smaller flowers that have been stamped in Highland Heather on the same colour card stock with the Strawberry Builder punch. Gently tease up the edges of the petals to create a little depth and add an iridescent rhinestone to the centre. Add these around the hexagon with glue dots.

It's pretty simple to put together, but I think it looks fabulous - and would work great in so many different colour combinations!

I hope you have enjoyed my project today - please take a look at the list below and continue through the hop and see what everyone else has created with our Purple Tones.

You are invited to the Inlinkz link party!

Click here to enter


Here's a list of supplies I used in today's project, click on the images to head over to my online store. A lot of the supplies I used today will not carry over into the brand New catalgoue, so be sure to grab them whilst you can!

      Product List


If you are on Facebook, why not pop over and check out our community group Craft & Banter. If you have a passion for paper craft, are brilliant at baking or a super talented seamstress then we would love to see you there. We share all types of crafting, run challenges and giveaways & generally have a right good natter.

See you soon 

Vickie 

Xxx

Sentimental Park Thank you Card. Inspire Create Challenges #163 Colour Challenge

  Good Afternoon Everyone, Happy Monday! Today I'm sharing a card I've made for the current Inspire Create Challenge - #163 which i...