
Good Afternoon Everyone
So glad you could join me today, I hope you are all well. This is my first blog hop with the Technique Squad and I've been really excited about it.
Each month we will be set a challenge based around some form of crafting technique - which will be lots of fun. This month, though as it's January and we are all still finding our feet after Christmas we have Creator's Choice - therefore no specific theme or technique we get to showcase any technique we fancy.
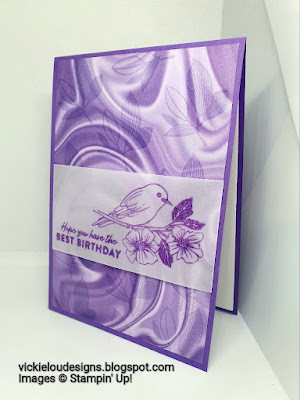
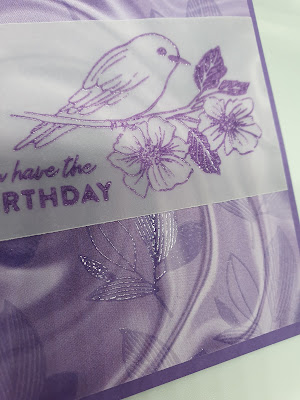
I decided to do some Heat Embossing. I love Heat Embossing and I feel that sometimes it gets a bit over looked. I have done 'standard' heat embossing on my background mat, and then stepped it up and done a little bit of coloured heat embossing onto vellum - so please do take a look below as I talk you though the process, but first let me show you the card I have created...

Measurements
Gorgeous Grape Card Stock
1pc - 4 1/8" x 11 3/4", scored at 5 7/8"
Basic White Card Stock
1pc - 5 5/8" x 3 7/8"
Vellum
1pc - 2" x approx 6"
Simply Marbleous DSP - Gorgeous Grape
1pc - 5 5/8" x 3 7/8"
----------------------------
Take your Gorgeous Grape card stock and fold along the score line, add the basic white card stock to the inside of the card.
Ink up the leaf image from Celebrate with flowers in Versamark ink and cover the piece of Simply Marbleous DSP. Add some clear embossing powder and heat set. Try to keep the DSP as flat as you can ad minimise as much warping as possible - this will just make it easier to sit flat on the card front.
Now, ink up the bird image with Gorgoeus Grape ink and stamp directly onto the Vellum, adding the sentiment as well. Sprinkle over some more clear embossing powder, making sure you have great coverage and then heat set. You need to act reasonably quickly with this process, but the ink takes a little while longer to dry on Vellum so you have enough time to do this without rushing too much. AGain try to keep the vellum as flat and straight as possible.
Once all the heat embossing had fully set and cooled, lay the strip of vellum across you DSP and fold each overhanging side round and secure on the back with a bit of tear and tape. You may want to tease the vellum round and then crisp up the folds with a bone folder to ensure a tight fit.
All that's left now is to adhere this whole panel to the card front.
It's a very simple card, but by adding that clear shiny embossing, really does make it special. With this technique, you can tailor your embossed images to whatever colour your projects require.
I hope you have enjoyed today's project. Please continue through the hop, there's lots more inspiration to be found. JoAnn is up next, click the button below to head over to her project.

Here's a list of supplies I used in today's project, click on the images to head over to my online store.
Product List
")
")

 Designer Series Paper")


Do get in touch if you would like to see a copy of our Annual Catalogue, new Mini Catalogue and SAB Booklet - let me know if you would like me to get them or both in the post for you.

If you are on Facebook, why not pop over and check out our community group Craft & Banter. If you have a passion for paper craft, are brilliant at baking or a super talented seamstress then we would love to see you there. We share all types of crafting, run challenges and giveaways & generally have a right good natter.
See you soon
Vickie
Xxx


.png)
.png)
Great card Victoria x
ReplyDeleteI think the heat embossing technique is really neat. I want to give it a try soon...the heat tool is on my wish list so maybe some time soon...Your card is very pretty! Thanks for sharing.
ReplyDeleteOooh! That image is lovely on the vellum!
ReplyDeleteGreat card! I haven't heat embossed in quite a while!
ReplyDelete