
Good Morning Everyone,
Happy Saturday - Today I'm blog hopping with my Team - we don't have theme's for our hops, we just get to share any project we like. I decided to show this pretty Gift Bag with a fancy bow and gift tag
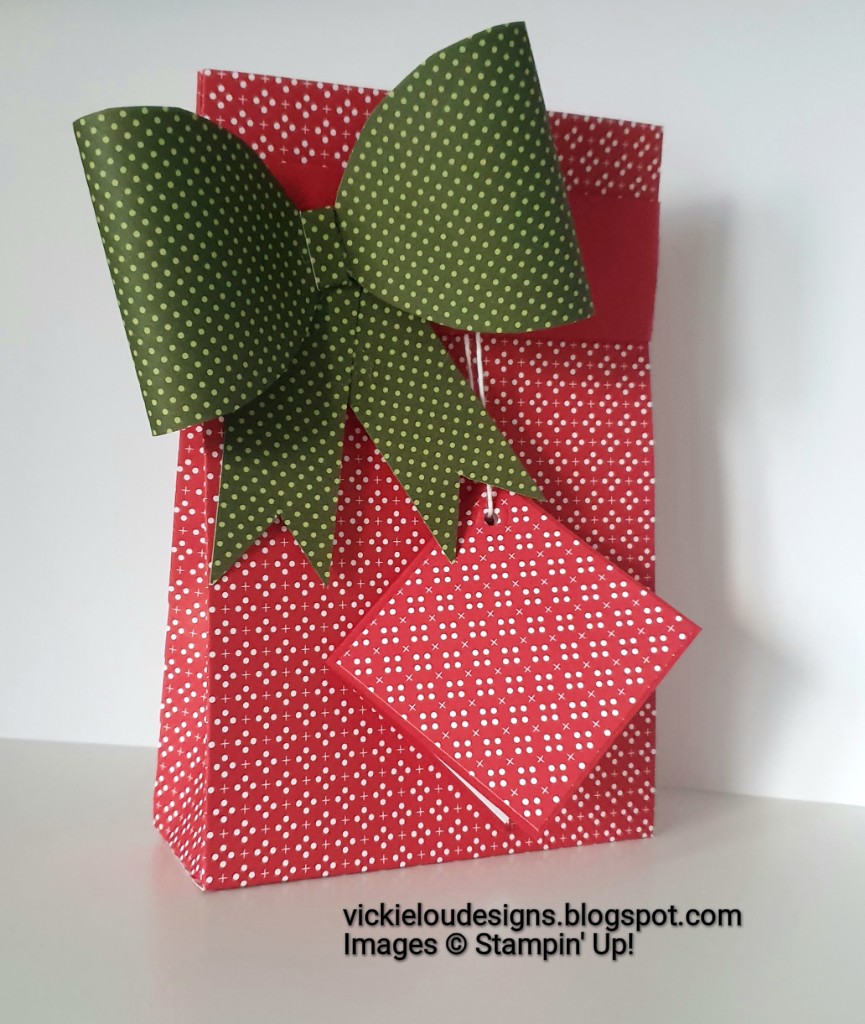

Measurements
GIFT BAG
Heartwarming Hugs DSP
1pc - 12" x 8"
Real Red Card Stock
1pc - 1 1/4" x 11 3/4"
BOW
Heartwarming Hugs DSP
1pc - 10" x 2 1/2"
2pc - 1" x 3"
1pc - thin scrap
GIFT TAG
Real Red Card Stock
1pc - 2 1/4" x 4 1/2", scored at 2 1/4"
Heartwarming Hugs DSP
1pc - 2 1/8" x 2 1/8"
Basic White Card Stock
1pc - 2 1/8" x 2 1/8"
---------------------------------
Take the DSP for the Gift Bagand score as follows:-
Long Side Full Scores - 1 1/2", 5 3/4", 7" & 11 1/2"
Long Side Part Scores - 3/4" & 6 1/2" down to approx 4"
Short Side - 6 1/2"
Fold and burnish all the full score lines (you can leave out the part score lines until later). Hold it so that the skinny rectangle is to the right and the horizontal score line in along the bottom. Cut up all these score lines to release the square, to make these tabs notch in ever so slightly. Make sure you keep your cut to the side of the rectangle straight. Cut away the small rectangle in the bottom right and the notch both the top and bottom of the remaining long skinny rectangle.
Add tear and tape to the the skinny rectangle, fold round and attach to the opposite side. Fold in the back and sides and the bottom, then glue down the front piece to create your base.
Pinch in the top of the bag, those part score lines will help the bag close nicely and neatly.
Wrap the Real strip of card stock round the top of the bag and adhere the ends together. Make sure the join is offset. You will need to trim off excess card stock.
To Create the Bow, fold the DSP in Half and Draw a shape kind of like an eye and cut out, making sure you keep a small section attached on the fold , like this


Open out the DSP, then fold each side into the middle and secure down with glue - I actually used my glue gun for speed. so you have a shape like this....

wrap the thin strip around the centre to cover the joins and add the two strips of DSP behind, once you have added banner tails. Add this to the belly band.
Finally Create the gift tag by folding the card stock along to score line and adding the DSP to the front and the basic white to the inside. Pop a hole into the top corner, thread in some bakers twine and tie this to the belly band.
I hope you have enjoyed today's project, please continue through the hop and take a look at what everyone has made. Karen is up next,

Here's a list of the supplies I used in today's card. Click on the images to head over to my online store.
Product List


Thanks for joining me today, please make sure you sign up to my Newsletters - I send a Weekly Round Up so that you get to see all the projects I have made that week - plus I also send a Monthly email full of news and updates for the upcoming month.
Do get in touch if you would like to see a copy of our Annual Catalogue. I will also be sending out copies of the new August to December Mini Catalogue- So let me know if you would like me to get one or both in the post for you.
If you are on Facebook, why not pop over and check out our community group Craft & Banter. If you have a passion for paper craft, are brilliant at baking or a super talented seamstress then we would love to see you there. We share all types of crafting, run challenges and giveaways & generally have a right good natter.
See you soon
Vickie
Xxx


.png)
.png)
Love it, beautiful bow x
ReplyDelete