Monday, 29 November 2021

Have a WILD Birthday Greeting Card. Creative Colour Challenges #CCC13

 Good Morning Everyone

Happy Monday! It's that time again, Yep, you guessed it - time to reveal my Creative Colour Challenges project for this week's Combo!

I've gone with the Wild Cats Stamp Set to create a fun and different Birthday Card.


And here's the colour combo that we have to follow this week! I absolutely love this combo, which I didn't think I would and although it's not my usual style, I love the card I have created too


Measurements

Cajun Craze Card Stock

1pc - 5 7/8" x 8 1/4", scored at 4 1/8"

1pc - 5 5/8" x 3 7/8"

Soft Succulent Card Stock

1pc - 1" x 5 5/8"

Basic White Card Stock

1pc - 5 5/8" x 3 7/8"

scraps

In the Wild DSP

1pc - 4 1/4" x 3 7/8"

-----------------

Create your card base by folding the larger piece of Cajun Craze along the score line

Take the smaller piece of Cajun Craze card stock and using the Animal Print embossing folder run it through the Cut & Emboss machine. Sponge the edges with Cajun Craze ink to pick out the embossing and give more depth.

Stamp the vines in Soft Succulent ink onto the thin strip of soft succulent card stock and add the the embossed panel, then add this to the card front. 

Place the DSP panel into your trimmer at a slight angle and trim off a small amount on either side of the long edge  to create the shape above. Add this to the card front.

On scraps of basic white stamp the two Wild Cats in Daffodil Delight and add the detail with cajun craze ink. Also stamp out 5 of the plant images in soft succulent. Cut all these out.

Arrange the two cats and four of the plants onto the card front using a mix of dimensionals and liquid glue to add different heights and depth. 

Cut the remaining plant in half and add to the basic white panel, putting the straight edges against the straight edges. Add this panel to the inside of the card.

Finally stamp the sentiment onto a strip of Basic white card stock, the trim the edges on a slant to mirror the DSP add to the card in the top right.

I hope you have enjoyed today's card, and please do pop over to Creative Colour Challenges and see what it's all about and maybe even enter a project yourself?


Here's a list of supplies I used in today's project, click on the images to head over to my online store Product List


Thanks for joining me today, please make sure you sign up to my Newsletters - I send a Weekly Round Up so that you get to see all the projects I have made that week - plus I also send a Monthly email full of news and updates for the upcoming month.

Do get in touch if you would like to see a copy of our Annual Catalogue. I will also be sending out copies of the new Mini Catalogue soon - So let me know if you would like me to get one or both in the post for you. ( Mini catalogues will be despatched late Dec)

If you are on Facebook, why not pop over and check out our community group Craft & Banter. If you have a passion for paper craft, are brilliant at baking or a super talented seamstress then we would love to see you there. We share all types of crafting, run challenges and giveaways & generally have a right good natter.

See you soon 

Vickie 

Xxx

Saturday, 27 November 2021

Heartwarming Hugs 3D Star Christmas Tree Decoration. Ink Stamp Share Blog Hop. November 2021

  Good Afternoon Everyone


Today I'm Hopping along with the Ink Stamp Share ladies and this months theme is Tree Decorations - I LOVE THIS THEME!! Its so much fun, and there will be lots of DIY inspiration here today, so take a look at my project and then check out everyone else's makes.


I decided to create a really simple decoration, using thin strip of DSP folded over and arranged in a certain way you can make this gorgeous tree hangings and with a few measurements changes up can create any size you like.


Measurements

Heartwarming Hugs DSP

8pc - 4" x 1"

----------------------------------

Take each strip and adhere the opposite ends together to form a sort of loop, don't flatten it. I decided to do 4 of one DSP design and 4 of the other side to create my star but you can do as you please - you just need 8 in total.


Now take four of the loops and adhere together like this..


Make sure you leave a gap in the centre, otherwise it will look crooked, and this is how it should look


Take the last four loops and add in between the four already glued in place, like this..


Once all the glue is dry feed some of the gold thread through one of the loops and tie with a knot at your required length. Then make sure the knot sits under the DSP - this just gives a prettier finish.

Told you it was super simple!!

I hope you enjoyed my project today and will give it a go yourself, but before you run off to the craft room, please pop on and see what Carol from The Stamping Ground has created

Roll Call

Jo Blackman

Annette Ball

Angie McKenzie

Sue McDonald

Cindy Mitchell-Clark

Gez Carpenter

Linda Moore

Stacey Marsh

Susan Simpson

Mo Rootes

Karen Egan

Kirsty Pattrick

Jill Chapman

Victoria Littlewood

The Stamping Ground

Annette Elias

Tricia Butts


Here's a list of supplies I used in today's project, click on the images to head over to my online store Product List


Thanks for joining me today, please make sure you sign up to my Newsletters - I send a Weekly Round Up so that you get to see all the projects I have made that week - plus I also send a Monthly email full of news and updates for the upcoming month.

Do get in touch if you would like to see a copy of our Annual Catalogue. I will also be sending out copies of the new Mini Catalogue soon - So let me know if you would like me to get one or both in the post for you. ( Mini catalogues will be despatched late Dec)

If you are on Facebook, why not pop over and check out our community group Craft & Banter. If you have a passion for paper craft, are brilliant at baking or a super talented seamstress then we would love to see you there. We share all types of crafting, run challenges and giveaways & generally have a right good natter.

See you soon 

Vickie 

Xxx

Heartwarming Hugs Christmas Gift Bag with Coordinating Gift Tag and fancy Bow. Stampin' Birds Blog Hop November 2021

 Good Morning Everyone,

Happy Saturday - Today I'm blog hopping with my Team - we don't have theme's for our hops, we just get to share any project we like. I decided to show this pretty Gift Bag with a fancy bow and gift tag


Measurements

GIFT BAG

Heartwarming Hugs DSP

1pc - 12" x 8"

Real Red Card Stock

1pc - 1 1/4" x 11 3/4"

BOW

Heartwarming Hugs DSP

1pc - 10" x 2 1/2"

2pc - 1" x 3"

1pc - thin scrap

GIFT TAG

Real Red Card Stock

1pc - 2 1/4" x 4 1/2", scored at 2 1/4"

Heartwarming Hugs DSP

1pc - 2 1/8" x 2 1/8"

Basic White Card Stock

1pc - 2 1/8" x 2 1/8"

---------------------------------

Take the DSP  for the Gift Bagand score as follows:-

Long Side Full Scores - 1 1/2", 5 3/4", 7" & 11 1/2"

Long Side Part Scores - 3/4" & 6 1/2" down to approx 4"

Short Side - 6 1/2"

Fold and burnish all the full score lines (you can leave out the part score lines until later). Hold it so that the skinny rectangle is to the right and the horizontal score line in along the bottom. Cut up all these score lines to release the square, to make these tabs notch in ever so slightly. Make sure you keep your cut to the side of the rectangle straight.  Cut away the small rectangle in the bottom right and the notch both the top and bottom of the remaining long skinny rectangle.

Add tear and tape to the the skinny rectangle, fold round and attach to the opposite side. Fold in the back and sides and the bottom, then glue down the front piece to create your base.

Pinch in the top of the bag, those part score lines will help the bag close nicely and neatly. 

Wrap the Real strip of card stock round the top of the bag and adhere the ends together. Make sure the join is offset. You will need to trim off excess card stock.

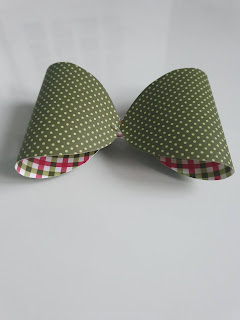
To Create the Bow, fold the DSP in Half and Draw a shape kind of like an eye and cut out, making sure you keep a small section attached on the fold , like this


Open out the DSP, then fold each side into the middle and secure down with glue - I actually used my glue gun for speed. so you have a shape like this....


wrap the thin strip around the centre to cover the joins and add the two strips of DSP behind, once you have added banner tails. Add this to the belly band.

Finally Create the gift tag by folding the card stock along to score line and adding the DSP to the front and the basic white to the inside. Pop a hole into the top corner, thread in some bakers twine and tie this to the belly band.

I hope you have enjoyed today's project, please continue through the hop and take a look at what everyone has made. Karen is up next,


Here's a list of the supplies I used in today's card. Click on the images to head over to my online store. Product List

Thanks for joining me today, please make sure you sign up to my Newsletters - I send a Weekly Round Up so that you get to see all the projects I have made that week - plus I also send a Monthly email full of news and updates for the upcoming month.

Do get in touch if you would like to see a copy of our Annual Catalogue. I will also be sending out copies of the new August to December Mini Catalogue- So let me know if you would like me to get one or both in the post for you.

If you are on Facebook, why not pop over and check out our community group Craft & Banter. If you have a passion for paper craft, are brilliant at baking or a super talented seamstress then we would love to see you there. We share all types of crafting, run challenges and giveaways & generally have a right good natter.

See you soon 

Vickie 

Xxx


Friday, 26 November 2021

Penguin Place Flip Front Fold Birthday Card.

 Good Evening Everyone,

Today's card is a cutie, made with the Penguin Place Bundle. It's a simple fancy fold, but very easy to make and looks very special, especially as this winter birthday card.

This was a card I made at a recent craft class held by my friend and team mate Bec Mosley  - So the layout and majority of the design is hers - I just switched p the decorations slightly. I stamped the background, used different DSP and turned mine into a birthday card.


Measurements

Fresh Freesia Card Stock

1pc - 4 1/8" x 5 3/4"

1pc - 8 1/4" x 3", scored at 4 1/8"

1pc - scrap

2021-23 In Colours 6x6" DSP Pack

Soft Succulent

1pc - 3 3/4" x 2 1/2"

Basic White Card Stock

2pc - 3 7/8" x 2 3/4"

1pc - 3 7/8" x 5 5/8"

1pc - scrap

--------------------------------

Take the larger piece of Basic white and cover it with some of the images from the stamp set - I chose to stamp the tree, presents, star and balloon in Soft Succulent ink to create a fun background. Layer this to the larger piece of Fresh Freesia card stock.

Fold the other piece of Fresh Freesia card stock along the score line and holding it as a small tent fold card, add the basic white piece to the inside and front of the card. 

On the DSP, stamp the Happy Birthday Sentiment repeatedly down the right hand side. I knew that the sentiment wouldn't fit exactly down the length, so I started stamping from the bottom as the banner covers up the top section so you don't really see it up there. 

Add this panel to the small card front.

Pop some glue on to the back of this little card and add to the larger piece of card stock from earlier, offsetting it towards the right slightly

On a scrap of Fresh Fressia stamp the sentiment, trim down and then banner tail the edges, making sure that it is going to be wider than the small card front section. Add this to the top of the card front with dimensionals, making sure you don't go too close to the edges, otherwise you may glue your whole card together.

Finally on a scrap, stamp the penguin body in memento and the nose and feet in bumblebee, cut out using the punch. Pop him on some dimensionals and add to the card front to the left of the Happy Birthday stamping,

Here's a list of the supplies I used in today's card. Click on the images to head over to my online store. Product List

Thanks for joining me today, please make sure you sign up to my Newsletters - I send a Weekly Round Up so that you get to see all the projects I have made that week - plus I also send a Monthly email full of news and updates for the upcoming month.

Do get in touch if you would like to see a copy of our Annual Catalogue. I will also be sending out copies of the new August to December Mini Catalogue- So let me know if you would like me to get one or both in the post for you.

If you are on Facebook, why not pop over and check out our community group Craft & Banter. If you have a passion for paper craft, are brilliant at baking or a super talented seamstress then we would love to see you there. We share all types of crafting, run challenges and giveaways & generally have a right good natter.

See you soon 

Vickie 

Xxx

Darling Dinos Happy Birthday Card

  Good Morning Everyone, Today I'm sharing my first project with a new stamp set from our Jan-Jun Mini Catalogue.  My daughter is so obs...