Good Morning Everyone,
Happy Monday. Hope you all had a fabulous weekend. There's a New colour challenge over on https://creativecolourchallenges.blogspot.com/ so I wanted to share what I have made for it.
I decided to make up some Birthday Gift bags and I've used the Beautifully Penned DSP and my Brayers for this one. I love the Paper as a Black and White Print - but how awesome does it look when it's been coloured. Don't forget that this Paper is FREE during Sale abration - which ends on Thursday, so be sure to get in whilst you can.
I have made two bags from one sheet of 12x12" paper, and just used the two different side. I used the Bermuda Bay for the Leaf Print and Smoky Slate for a more subtle bag with the dots which is the pattern on the other side.
The finished dimensions are 4 1/2" x 4 1/2" x 1 1/2", so a great size to fill with all sorts of goodies.
Measurements - I'll give them for just one bag
Beautifully Penned DSP
1pc - 12"x 6"
fussy cut flower cluster
Basic White
scrap
Coloured Card stock
Scrap
------------------------
Take the DSP And with your brayer and ink to the whole piece. I used a brayer because I like how it covered it, but you could use blending brushes or sponges.
Once dry, pop into your Simply Scored and score as follows:-
Long Side - 1 1/2", 5 3/4", 7 1/4" & 11 1/2"
Long Side (Part Scores) - score at 3/4" & 6 1/2" down to approx 3"
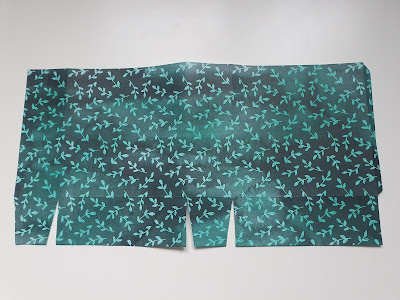
Fold and burnish your full score lines well and then cut up the shorter score line to create square tabs and take away the small skinny rectangle and the bottom right, so you are left with this....
Add tear and tape to the thin tab on the right and then fold this around and adhere to the opposite side. At the bottom, fold in the sides, the back and then adhere the front panel down
Pinch in the top of the bag, the part score lines will help the bag close neatly and evenly. Take a hole punch tool and add two holes about 1 1/2" down from the top. Thread through some Gingham ribbon and tie in a bow or a square knot at the front.
On a scrap of basic white, stamp the sentiment and layer onto coloured card Stock add this to the front of the bag towards the bottom left, then add a fussy cut flower from the DSP which is coloured in with Stampin write markers.
Finally add some rhinestones for a little bling - on one of the bags, I coloured the rhinestones with the my Stampin Blends.
Here's a list of the supplies I used in today's card. Click on the images to head over to my online store. Product List
I hope you enjoyed today's project - Please do pop on over to https://creativecolourchallenges.blogspot.com/ and take a look at what we are all about, and maybe create your own project using these colours.
Thanks for joining me today, please make sure you sign up to my Newsletters - I send a Weekly Round Up so that you get to see all the projects I have made that week - plus I also send a Monthly email full of news and updates for the upcoming month.
Do get in touch if you would like to see a copy of our Annual Catalogue. I will also be sending out copies of the new August to December Mini Catalogue- So let me know if you would like me to get one or both in the post for you.
If you are on Facebook, why not pop over and check out our community group Craft & Banter. If you have a passion for paper craft, are brilliant at baking or a super talented seamstress then we would love to see you there. We share all types of crafting, run challenges and giveaways & generally have a right good natter.
See you soon
Vickie
Xxx


.png)

.png)
.png)
No comments:
Post a Comment