Monday, 31 May 2021

Bouquet of Hope Paper Pumpkin Kit available in Europe!!

   Good Afternoon Everyone,


Thought I'd just jump on a talk to you quickly about the Brand New Paper Pumpkin Kit that is available NOW.

As you may or may not know Paper Pumpkin is a subscription Kit service available from Stampin Up in several of it's markets. Unfortunately the UK isn't one of them that  currently have the monthly subscription available, however every so often Stampin Up work hard to provide us with a limited one off release and the Bouquet of Hope does not disappoint.

This particular kit is centered around sending cards to provide comfort, care & condolences. It has gorgeous floral images and supportive sentiments.

The kit helps you create 9 cards, three of each design along with coordinating envelopes. But the Stamp Set can be used over and over, all year round to continue sending love and thoughts.

Kit Contains

  • The Bouquet of Hope Stamp Set: an exclusive stamp set not available anywhere else!
  • A Stampin’ Spot
  • Enough materials to create nine cards, including patterned card bases, decorative die-cut pieces, embellishments, and more!
  • Nine coordinating envelopes
  • Nine Card Bases
  • Adhesive

Coordinating colours: Basic Black, Bumblebee, Just Jade, Merry Merlot, Mossy Meadow, Rococo Rose and also Coordinates with the Flower & Field Designer Series Paper, a Sale-A- Bration item.
  
Pop on over to my Online Store for more information on this kit, or to place an order.

Thanks for joining me today, please click follow or subscribe by email to be notified each time I post a new project. Also be sure to sign up to my Newsletters. I send two per month, one with News & Updates and a second with an exclusive newsletter subscriber tutorial.

Do get in touch if you would like to see a copy of our Annual and/or our Jan-Jun Mini Catalogue. We have a brand new Annual Catalogue coming out in May - So let me know if you would like to get on that list.

If you are on Facebook, why not pop over and check out our community group Craft & Banter. If you have a passion for paper craft, are brilliant at baking or a super talented seamstress then we would love to see you there. We share all types of crafting, run challenges and giveaways & generally have a right good natter.

See you soon 

Vickie 

Xxx


Sunday, 30 May 2021

DSP Decorated Notepads using Stampin Up Supplies. #scrapbusting. Crafty Collabs Share it Sunday May 2021

  Good Afternoon Everyone,

Today I'm taking part in a Crafty Collaborations Share it Sunday Blog Hop where we show you something we are working on.

I wanted to show you these fabulous decorated Notepads which I have been making for a long time. I think they are great to keep in my stash and I hand them out for all sorts of reasons, thank you gifts, a just because gift, to team members or customers.

I get these pads from a local print shop who sell them which they make from surplus print jobs. I'm sure you could get some notepads pretty easily wherever you are. My pads measure 7.5cm x 10.5cm (approx 4" x 3")


Measurements

Now I don't normally work in cm but I just couldn't make inches work for these without it being ridiculously faffy

Card Stock 

7.7cm x 22.2cm

DSP

7.5cm x 10.5cm

Take your card stock and score at 10.5cm and 11.5cm. fold and burnish these well.

You will have one side which is slightly longer, only mm but that is the front flap piece. So adhere the back of the notepad to the shorter section so that the thin section sits over the top and the other piece sits nicely over the front.

Add DSP and some sentiments, I made sure that I kept decoration to a minimum as I know a lot of people I give these to, keep them in their handbag so you don't want to be adding to much that could get battered or bashed.


Please do take a look at what every one else has been working on too....


Here's a list of the supplies I used in today's card. Click on the images to head over to my online store. Product List

Thanks for joining me today, please click follow or subscribe by email to be notified each time I post a new project. Also be sure to sign up to my Newsletters. I send two per month, one with News & Updates and a second with an exclusive newsletter subscriber tutorial.

Do get in touch if you would like to see a copy of our Annual and/or our Jan-Jun Mini Catalogue. We have a brand new Annual Catalogue  OUT NOW- So let me know if you would like to get one in the post for you.

If you are on Facebook, why not pop over and check out our community group Craft & Banter. If you have a passion for paper craft, are brilliant at baking or a super talented seamstress then we would love to see you there. We share all types of crafting, run challenges and giveaways & generally have a right good natter.

See you soon 

Vickie 

Xxx

Now Really is the Best Time to Join my Stampin Up Team

  Good Afternoon Everyone.


Hope you are all having a fab weekend. 

Just wanted to pop a quick post out to talk to you about something pretty fantastic and there's not long left to get this AMAZING DEAL......


It's our amazing Joining offer.....You get to create a kit with product of your own choice to the value of £130 for only £99 and Stampin Up will cover the usual £4.95 postage cost, plus business resources including catalogues. As a demonstrator we are currently able to Pre-order a selection of items fro the brand new annual catalogue which is due out in May - You can add these to your starter kit too!!

You can put in whatever you want!! Not many companies let you chose your kit!!! And if you join now, you can add products from our Mini Catalogue and the Current annual catalogue.

So why sign up rather than just placing an order as a customer?
 You are not obliged to sell anything, so you can purchase so many goodies, with £31 of Free stuff and you receive a 20% discount and as long as you hit the low quarterly minimums you will continue to get the discounted rate.

Plus you will get to Pre Order new product from catalogues before customers. There's events held which you will be able to attend (during 2020 and so far in 2021, these events have been virtual due to Covid) and then there's the great community of the team and Stampin Up.

So, what if you would like to earn as a business?
Well, you get all the perks above along with help and guidance to achieve your goals. There's a great compensation plan and you can also work towards the yearly incentive trip!

If you are interested or have any questions, give me a call, email or find me on Facebook, I would love to have a chat and see how you could fit into our Stampin Up family

Email - vickieloudesigns@outlook.com
Tel - 07905615260 (I do have a 20 month old, so if I don't answer, please do leave a message and I will come straight back to you).
Facebook - Vickie Lou Designs.
Website - https://vickielittlewood.stampinup.net/
See you soon
Vickie
Xxx

Fabulous Delicate Petals Wedding Card. Share it on a Sunday

 Good Morning everyone,

Its share it on a Sunday and this week we are making wedding themed projects.

Now please bear with me on this, because I seem to have gone a little rogue, but there is a reason. Good friends of our got married a few years a go and this card is a tribute to them and there colour scheme. My Friend is not a pink and fluffy girly girl or completely and the other end of the spectrum - but she does have particular tastes (and before anyone says anything - she will 100% agree with me on all of this).

I have chosen to create this card as a nod the the wedding day, but I can also send this as their anniversary card as, I think the sentiment could work for both.

I've used the Delicate petals and Elegantly Said stamp set and the Simply Elegant DSP.


Measurements

Night of Navy Card Stock

1pc - 4 1/8" x 11 3/42, scored at 5 7/8"

scraps

Basic White Card Stock

2pc - 5 5/8" x 3 7/8"

scrap

Simply Elegant DSP

scraps

Take the Night of Navy Card Stock and fold along the score line, adding one of the basic white pieces to the inside.

On a scrap of basic white stamp the lacy segment shape three times to create a semi circle. trim this down and then using some blends add some colour. Add this to the other piece of basic white so the straight edge is flush with left hand side and in the centre. I did this on scrap in case I messed up with my positioning. I felt it easy to gauge the centre with a piece I could wiggle about!  but you could do it straight onto the mat if you wanted.

Add the sentiment to the lower right hand side. 

Punch out three flowers in card and three in dsp and layer these up, adding these to the card front. I used this specific design so that the gold circles became the centre of the flowers...


Adhere the panel to the card front.

Finally take some of the Gray Granite ribbon, wrap around the card front and tie in a neat knot - trim the edges.

Like I said, this may not be to everyone's taste but my friend will love the attention to detail and thought gone into this - from the Grey, Blue and Gold colour combo to the gray lace with accents of blue which appeared on her dress..

Please take a look at what Donna and Karen have both made today...

Taffy Crafting

Crafty Karen Designs

Here's a list of the supplies I used in today's card. Click on the images to head over to my online store. Product List

Thanks for joining me today, please click follow or subscribe by email to be notified each time I post a new project. Also be sure to sign up to my Newsletters. I send two per month, one with News & Updates and a second with an exclusive newsletter subscriber tutorial.

Do get in touch if you would like to see a copy of our Annual and/or our Jan-Jun Mini Catalogue. We have a brand new Annual Catalogue  OUT NOW- So let me know if you would like to get one in the post for you.

If you are on Facebook, why not pop over and check out our community group Craft & Banter. If you have a passion for paper craft, are brilliant at baking or a super talented seamstress then we would love to see you there. We share all types of crafting, run challenges and giveaways & generally have a right good natter.

See you soon 

Vickie 

Xxx

Saturday, 29 May 2021

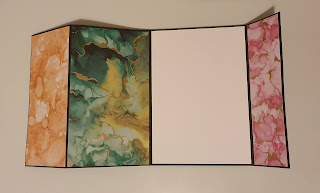
Expressions in Ink Double Flap Fold Card. Ink Stamp Share Something New Blog Hop. May 2021

 Good Afternoon Everyone,

Today I'm taking part in the Ink Stamp Share Blog Hop and this month we are sharing Something New. I have chosen to show you all the stunning Expressions in Ink DSP and using the Double Flap Fancy Fold, I've managed to show off a few of the different patterns from the pack. The sentiment is from a new stamp set too called Biggest Wish which should be on everyone's shelf!


Measurements

Basic Black Card Stock

1pc - 11 3/4" x 5 7/8"

1pc - 2 1/8" x 2 1/8"

1pc - 3/4" x 11 3/4"

Basic White Card Stock

1pc - 5 3/4" x 4"

1pc - 2" x 2"

Expressions in Ink DSP

2pc - 3 1.4" x 5 3/4"

2pc - 1 1/2" x 5 3/4"

1pc - 2 3/8" x 5 3/4"


Take your largest piece of Basic Black cardstock and score on the long side at  2 1/2", 5 7/8" & 10".  Fold the card along the centre score line as you would to make a standard card base, then fold the top score line towards the left, and then the bottom score line towards the left. this will give you those two flaps/folds.


Now simply add your DSP panels to the card as below.


Fold the card up and wrap around the 1" strip of basic black your card and secure with a little liquid glue at the front. Trim off the excess cardstock. Make sure that the belly band is loose enough to move on and off your card, but tight enough to stay put when closed.

On the smaller piece of basic white stamp the sentiment from the Biggest Wish stamp set and layer onto the black that is left. Add this panel tot he belly band.

I hope you have enjoyed today's card. Please click the button below and head over to see what Rochelle has made.


Roll Call

Kim Price

Sue McDonald

Cindy Mitchell-Clark

Stacey Marsh

Tricia Butts

Jo Blackman

Karen Egan

Jen Charles

Angie McKenzie

Tracie St-Louis

Gez Carpenter

Annette Ball

Libby Fens

Mo Rootes

Joanna Barnes

Verity Pursglove

Victoria Littlewood

Rochelle Laird-Smith

Jill Chapman

Here's a list of the supplies I used in today's card. Click on the images to head over to my online store. Product List

Thanks for joining me today, please click follow or subscribe by email to be notified each time I post a new project. Also be sure to sign up to my Newsletters. I send two per month, one with News & Updates and a second with an exclusive newsletter subscriber tutorial.

Do get in touch if you would like to see a copy of our Annual and/or our Jan-Jun Mini Catalogue. We have a brand new Annual Catalogue  OUT NOW- So let me know if you would like to get one in the post for you.

If you are on Facebook, why not pop over and check out our community group Craft & Banter. If you have a passion for paper craft, are brilliant at baking or a super talented seamstress then we would love to see you there. We share all types of crafting, run challenges and giveaways & generally have a right good natter.

See you soon 

Vickie 

Xxx

Wrapped Bouquet Gift Box. Stampin Bird's Showcase Blog Hop May 2021

Good Morning Everyone,

It's the last Saturday of the month and that means we have our Monthly Stampin Bird Showcase Blog Hop. The theme is always ANYTHING GOES, so I've made this fabulous gift box which measures 4" x 3" x 2" so it's a great size for all sorts of goodies and treats.Decorated simply with the Tidings of Christmas DSP and the Wrapped Bouquet stamp set


Measurements

Cherry Cobbler Card Stock

1pc - 9" x 11"

Tidings of Christmas DSP

2pc - 2 7/8" x 3 7/8"

2pc - 3 7/8" x 1 7/8"

1pc - 2 7/8" x 1 7

Take the cherry cobbler and score as follows:-

Long Side - 3", 5", 8" & 10"

Short Side - 1", 3" & 7"

Fold and burnish the score lines. Now cut away at the card until you are left with a shape like this.


Add the larger DSP panels to the centre run of rectangles alternating a large piece and a smaller piece.  The smallest piece goes onto the lid, so if you have a directional pattern make sure you put in onto the card 'upside down' when you look at the card stock like it sits above.

Stamp the sentiment from Delicate Petals stamp set in Cherry Cobbler onto the third panel along - the panel that is the only rectangle with no card stock above it as this will eventually become the front of the box.

Pop some tear and tape onto the tab on the right hand side, then fold round to attach to the opposite edge. At the bottom fold in the two side, back and then adhere down the front to create a solid base.

On a scrap of basic white stamp the bouquet in early espresso ink, then once dry colour in with your blends

Run the image through your Cut & Emboss Machine using the coordinating dies. 

Add wink of stella to all the leaves in the image, just to add a little sparkle. Pop this onto the front of the box  using dimensionals above the sentiment.

I hope you enjoyed my project for today - Please click the next button below to see what Bec has created


Here's a list of the supplies I used in today's project. Click on the images to head over to my online store. Product List

Thanks for joining me today, please click follow or subscribe by email to be notified each time I post a new project. Also be sure to sign up to my Newsletters. I send two per month, one with News & Updates and a second with an exclusive newsletter subscriber tutorial.

Do get in touch if you would like to see a copy of our Annual and/or our Jan-Jun Mini Catalogue. We have a brand new Annual Catalogue  OUT NOW- So let me know if you would like to get one in the post for you.

If you are on Facebook, why not pop over and check out our community group Craft & Banter. If you have a passion for paper craft, are brilliant at baking or a super talented seamstress then we would love to see you there. We share all types of crafting, run challenges and giveaways & generally have a right good natter.

See you soon 

Vickie 

Xxx


Darling Dinos Happy Birthday Card

  Good Morning Everyone, Today I'm sharing my first project with a new stamp set from our Jan-Jun Mini Catalogue.  My daughter is so obs...