Sunday, 30 August 2020

Ornate Style Scrapbusting Happy Birthday Card. Share it on a Sunday

 Good Morning Everyone.

Yes, that's right guys, it's Sunday - so we have another installment of Share it on a Sunday. This week our theme is Scrapbusting.

I love being able to create some marvelous projects from scraps and today's card is no different:


As usual I will run through my project tutorial, then link to Donna and Karen's blogs so you can see what they have created for this fun theme.

Measurements

Whisper White Cardstock

1pc - 4 1/8" x 11 3/4", scored at 5 7/8"

1pc - 3 5/8" x 5 3/8"

Brights Collection Cardstock

Strips of scraps of a variety of colours


Take the smallest piece of Whisper White Cardstock and completely cover one side with Stampin Seal. Now taking different width strips of Brights cardstock, add them to this piece whisper white, running along the shortest edge. Take your time and make sure that you butt each piece up against the last. You don't want any of the white to show through underneath, or have any adhesive showing. Trim off all the edges.

Now, rub the panel with your embossing buddy. Ink up the image with versamrk ink and add towards the top. Sprinkle with white embossing powder and set with your heat tool. Then repeat this process with the Happy Birthday Sentiment from Itty Bitty Birthdays under the image.

Add Stampin Seal to the back of this panel and add to a card base that you have created by folding the larger piece of whisper white along the score line.

Please head over and see what Donna & Karen have also made....

Taffy Crafting

https://taffycrafting.blogspot.com/2020/08/scrapbusting-challenge-with-playing.html

Crafty Karen Designs.

https://craftykarendesigns.blogspot.com/2020/08/scrap-busting-post-it-notes-share-it-on.html

Here's a list of the supplies I used in today's card, click on the images to head over to my online store.

Product List

Thanks for joining me today, please click follow or subscribe by email to be notified each time I post a new project. Also, be sure to sign up to my newsletters. I send two per month, one with news and Updates and a second with a FREE Newsletter Subscriber Exclusive Project Tutorial.

Have a wonderful Sunday everyone,

See you soon

Vickie

xxx


Friday, 28 August 2020

Posted for You Best Wishes Card

 Good Morning Everyone

Happy Friday, It's pretty wet and miserable here again in Huddersfield, I hope you are fairing better wherever you are in the world!!

Today I have this sweet little Best Wishes Card using the cutest flower image from Posted for You stamp set.  Any of you who follow me regularly will know I love to colour, and this little flower is really quick and easy to colour!


Measurements

Basic Gray Cardstock

1pc - 4 1/8" x 11 3/4", scored at 5 7/8"

1pc - scrap for the oval

Whisper White Cardstock

2pc - 5 5/8" x 3 7/8"

1pc - scrap for the oval


Create your card base by folding the Basic Gray cardstock along the score line, and add on of the Whisper White pieces to the inside.

One the other piece of  Whisper White, stamp the floral image from Posted with You in memento ink all over it to create a background. Once the memento is dry, colour them in using a selection of Stampin' Blends.

Add this panel to the card front.

Now, run two ovals from the Stitched Shapes Dies through your die cutting machine, The larger one in Basic Gray and a small one in Whisper White.

Stamp the sentiment from Path of Petals on the Whisper White  Oval in Basic Gray ink and layer onto the Basic Gray Oval. Add this to the card front.

You could easily switch up the colours to match the recipients fave colours! Or use watercolour pencils for a different finish!


Here's a list of the supplies I used in today's card, click on the images to head over to my online store.


Product List


Thanks for joining me today, please click follow or subscribe by email to be notified each time I share a new project. Also,be sure to sign up to my Newsletter. I send two per month, one with News and Updates and second with a FREE Exclusive Newsletter subscriber project tutorial.

Have a great Friday

See you soon

Vickie

xxx


Tuesday, 25 August 2020

Snowflake Splendor Snowman Seasons Christmas Card. #33sketches no14

 Good Morning Everyone,


I hope all is well with you guya. We are all good here, except it has rained ALL night and shows no sign of stopping!!!


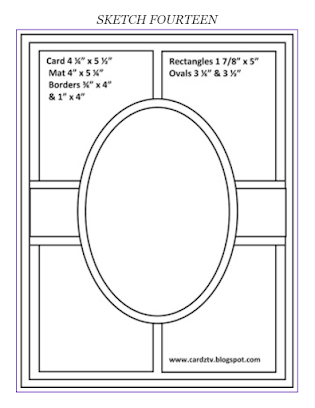
Now, I know it is August and we are still hoping for Summer to continue that little bit longer, But I wanted to share a card with you today... dare I say it? A Christmas Card. Haha. I wanted to show you this fabulous Snowflake Splendor DSP that is out in our Mini Catalogue.  I also decided to use a sketch layout from the #33sketches as I thought this particular one was perfect with this DSP and this cute little Snowman.


Here is the sketch I followed, from cardztv.blogspot.com


Measurements

Misty Moonlight Cardstock

1pc - 4 1/8" x 11 3/4", scored at 4 1/8"

1pc - 3 7/8" x 1 1/8"

1pc - scrap for the Oval

Highland Heather Cardstock

1pc - 5 5/8" x 3 7/8"

Whisper White Cardstock

1pc - 5 5/8" x 3 7/8"

1pc - scrap for the Oval

Snowflake Splendor DSP

2pc - 1 3/4" x 5 3/8"

1pc - 1" x 3 7/8"


Take your piece of Misty Moonlight cardstock and fold along the score line to create your card base, add the whisper white to the inside and the highland heather to the card front. Place the two pieces of Snowflake Splendour onto the highland heather piece, making sure you have equal borders all the way around. Layer up the strip of DSP and the misty moonlight strip and then add to the centre of the card.

Using your die cutting machine and the stitched shapes dies, cut the largest Oval in Misty Moonlight and the next size down in whisper white. Stamp the sentiment from Festive Post at the bottom of the whisper white oval in Misty Moonlight ink. Layer both ovals together and add to the centre of the card front with dimensionals.

On some scrap whisper white stamp out a Snowman, his arms and his hat in memento them cut out using the Snowman Builder Punch. Once the ink has dried colour in with a selection of Stampin Blends. Add the snowman to the Oval piece using dimensionals.

Here's a list of all the supplies I used in today's card, click on the images to head over to my online store.


Product List

Thanks for joining me today, please click follow or subscribe by email to be notified each time I post a new project. Also, be sure to sigh up to my Newsletters. I send two per month, one with News and Updates and a second with a FREE Newsletters Subscriber Exclusive Project.

MINI CATALOGUE - If you don't currently have a Stampin Up demonstrator and would like a copy of the Mini Catalogue, send me an email click here and I will be more than happy to pop a copy in the post for you.


Have a Great Tuesday Folks

See you soon

Vickie

xxx


Monday, 24 August 2020

Flowers For Every Season Birthday Card. #33sketches no13

 Good Morning Everyone,

Hope you all had a fabulous weekend. We had pretty terrible weather so we spent most of the weekend playing games inside!

Today I have another card in my #33sketches challenge. I really love this one as I have manged to show off quite a few of the different patterns in the gorgeous Flowers for Every Season DSP and ALL our new In Colours.

This is the sketch I followed, from Cardztv.blogspot.com


Measurements

Cinnamon Cider Cardstock

1pc - 4 1/8" x 11 3/4", scored at 5 7/8"

Whisper White Cardstock

1pc - 5 5/8" x 3 7/8"

Just Jade Cardstock

2pc - 2 5/8" x 2 5/8"

Flowers for Every Season DSP

1pc - 5 5/8" x 3 7/8"

1pc - 1 3/4" x 5 5/8"

2pc - 2 1/4" x 2 1/4"

This is a very simple card to put together, it's just really adding lots of layers!!

Fold your Cinnamon Cider Cardstock along the score line and add your piece of whisper white to the inside. Add the largest piece of DSP to the card front.

On the strip of DSP, stamp the sentiments, one at the top and one at the bottom in memento ink, then add to the card front towards the left hand side.

Layer up the two pieces of DSP onto the Just Jade squares and add to the card front, Place to first one down with liquid glue so it is flat, then use dimensionals to adhere to second one in place. 

Add three of the Magenta Madness enamel tops to the top right hand corn and you are done!!! Told you it was super simple.

Here's a list of all the supplies I used in today's card, click on the images to head over to my online store.


Product List

Thanks for joining me today, I hope you liked my card. Please click follow or subscribe by email to be notified each time I post a new project. Also, be sure to sign up to my Newsletters. I send two per month - One with news & updates and a second with a FREE Newsletter Subscriber exclusive project tutorial.


Have a brilliant Monday,

See you Soon

Vickie

xxx


Darling Dinos Happy Birthday Card

  Good Morning Everyone, Today I'm sharing my first project with a new stamp set from our Jan-Jun Mini Catalogue.  My daughter is so obs...