Good Morning Everyone
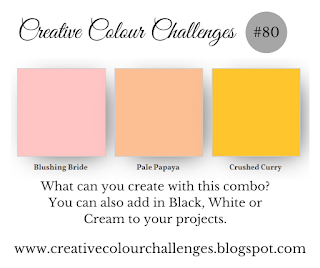
Today I'm sharing the card I have made using this week's Creative Colour Challenges combo, which is Blushing Bride, Pale Papaya & Crushed Curry! Now, let's be honest I'm not sure many of use would automatically combine these colours but that is the beauty of these challenges - they push us out of our usual comfort zone - This mix definitely got my grey matter working, that's for sure!
I decided to use the Hello Ladybug stamp set and coordinating Ladybug Builder Punch and I'm so chuffed with how it all turned out. The bumblebee sits perfectly over the background of pretty Blushing Bride & Pale Papaya Flowers.
Measurements
Crushed Curry Card Stock
1pc - 4 1/8" x 11 3/4", scored at 5 7/8"
3pc - strips 1/4" wide
Basic Black Card Stock
1pc - 5 5/8" x 3 7/8"
scraps
Basic White Card Stock
1pc - 5 5/8" x 3 7/8"
1pc - 3 3/4" x 5 1/2"
scrap
Layering Designs Vellum
Scrap
---------------------------------------
Take the Crushed Curry Card Stock and fold along the score line to create your card base, adding the larger piece of Basic White to the inside.
Stamp flower image from hello Ladybug and stamp it all over the remaining piece of Basic White. I stamped the image once, then inked up the stamp again, then stamped a second time right over the top but I rotated my stamp slightly to stamp in between the first 'layer' of petals. This gives a fuller flower head and where the petals overlap, it gives a slightly darker shade. I used Pale Papaya & Blushing Bride for petals and I added the flower centres with Crushed Curry ink.
Layer this panel to the Basic Black piece and then add to the centre of the card front.
Stamp the sentiment in Crushed Curry, trim and layer to some Basic Black. Trim this down as well so you have a nice even border to the top and bottom. Add this to the card front, lining up the right hand side to be flush with the stamped panel below
Using the Ladybug Builder punch, cut out a Body in Basic Black and the wings in layering designs vellum. Take the 1/4" strips of Crushed Curry card stock and add to the body section of the punch out and trim to create the bee's body. Add the vellum to the bee on the first strip, just below the head.
Add you Bumblebee to the left of the sentiment.
Finally, add some of the gold pastel adhesive backed sequins to the centre of all the flowers.
I hope you have enjoyed my card today - if you would like more information on the Challenge, or have a project you would like to enter - head over to my blog Creative Colour Challenges
Here's a list of supplies I used in today's project, click on the images to head over to my online store
Product List
If you are on Facebook, why not pop over and check out our community group Craft & Banter. If you have a passion for paper craft, are brilliant at baking or a super talented seamstress then we would love to see you there. We share all types of crafting, run challenges and giveaways & generally have a right good natter.
See you soon
Vickie
Xxx


.png)
.png)
No comments:
Post a Comment