
Good Evening Everyone
I'm taking part in the Stamp n Hop Blog Hop and our them is Saleabration.
As you may or may not know (if you don't where have you been?), from between the 5th January and 28th February Stampin Up run a promotion where you can earn exclusive Stampin Up Product which is only available for that period for FREE with qualifying orders. We have stamp sets and DSP galore and they are fabulous!
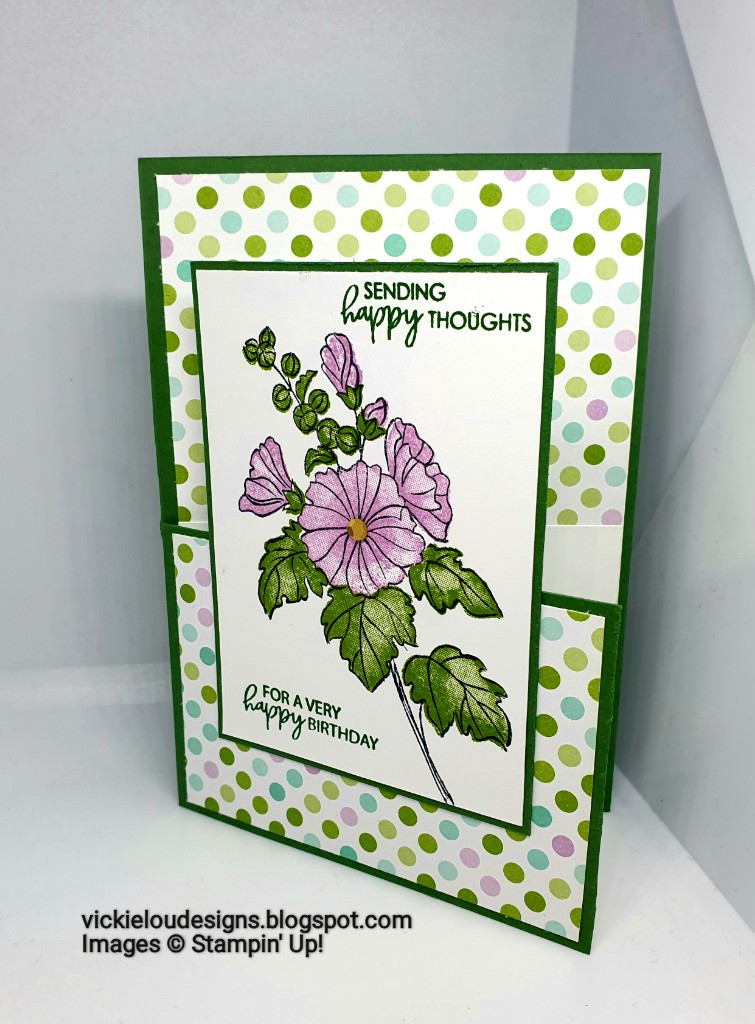
Today I'm using a FREE Stamp set and some of the FREE paper to create a really lovely Stable Door Birthday Card.


Measurements
Garden Green Card stock
1pc - 5 7/8" x 8 1/4", scored a t 4 1/8"
Dandy Garden DSP
1pc - 5 5/8" x 3 7/8"
2pc - 3 7/8" x 2 5/8"
Basic White Card Stock
2pc - 2 7/8" x 3 7/8"
1pc - 3 7/8" x 2 5/8"
----------------------------------------
Take your Garden Green card stock and mark at 3" a small pencil dot on the score line, and one at the right hand side, again at 3". Pop this into your trimmer and cut down to the 3" mark on the score line, then rotate the card stock so that the cut line is to your left and cut down to the score line from the 3" pencil mark. This should free up a panel of card stock and leave you a 'stable door' card front. Fold and burnish this piece, keeping the score line to the left as you would a standard card base.
Layer this to the 3" x 4 1/8" piece of Garden Green card stock you cut away from your base earlier.
Add the two pieces of DSP the the 'Door' one on the inside and one on the front.
Take the 3 7/8" x 2 5/8" of Basic white and adhere it to the bottom of the remaining piece of DSP and then place this panel on the inside of the card base.
Close the 'Door' of the card and position the stamped panel so that it is central to the whole card and then add glue to the back of it where it will sit on the 'door'. Then add the last piece of Basic White behind this.
I hope you have enjoyed my card today, it's a great fold and really simple to create. Please continue through the hop to get lots more inspiration and see some more of the fabulous sale abration goodies available. Anna is up next.
Roll Call –
Here's a list of supplies I used in today's project, click on the images to head over to my online store
Product List
")
 Designer Series Paper")


If you are on Facebook, why not pop over and check out our community group Craft & Banter. If you have a passion for paper craft, are brilliant at baking or a super talented seamstress then we would love to see you there. We share all types of crafting, run challenges and giveaways & generally have a right good natter.
See you soon
Vickie
Xxx


.png)
.png)
Lovely fun fold card Vickie, love this stamp set and the dsp x
ReplyDeleteSnap, we've used the same fun fold. Lovely card x
ReplyDeletesuch a nice idea with this great stamp set
ReplyDeleteLovely card Vickie. Love this fold too.Thanks so much for hopping along with Stamp n' Hop this month.
ReplyDelete