
Good Morning Everyone
I hope you are all well?
As you know, I'm a Stampin Up Demonstrator and my two closest Crafty Friends came from being a Demonstrator. Our paths would never have crossed if it weren't for Stampin Up and I'll be forever grateful for that. We do a lot together - as you may have seen our Share it on a Sunday Series, We all signed up in a February so Donna, Karen and Myself have decided to come together again today a do a mini blog hop to celebrate our Stampaversary.
We set a challenge to create two projects - one card and one 3D using the Expressions in ink DSP for one and the Shaded Summer for the other. I slightly missed the brief and used both on both projects. But I think I've still managed a lovely project, so hopefully they will forgive me!! Haha.

Measurements
Pear Pizzazz Card Stock
1pc - 8" x 8"
1pc - 5 5/8" x 3 7/8"
scraps
Pale Papaya Card Stock
1pc - 4 1/8" x 11 3/4", scored at 5 7/8"
Gold Metallic Paper
scraps
Expressions in Ink DSP
1pc - 6" x 6"
1pc - 4 3/4" x 5 1/2"
scraps
--------------------------------
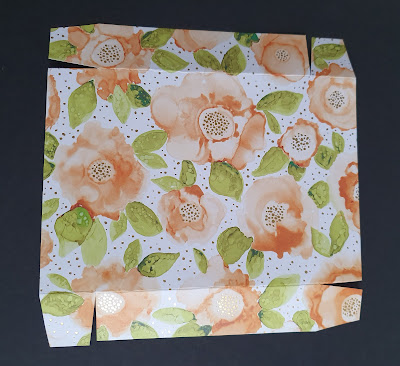
Take the square piece of Pear Pizzazz and score on all four sides at 2". Fold and burnish all the score lines and then snip away at the smaller corner squares to create tabs. Hold the card stock and cut up the first score line at the bottom left, and notch in. Rotate your card 90degrees and do the same. Repeat this process for all the four corners. You will have a piece that looks like this.

Repeat this process with the DSP, but score at 1" on all four side. But when scoring pull the DSP a tiny bit away from the edge of your score board, it doesnt have to be much its like 1/16". But I find it easy to do it this way than faff with those small number when cutting card Stock. This process will just help the lid fit better
Add tear and tape to all the tabs, fold in to create the base and the lid. Pop to one side for now.
For the card, fold the Pale Papaya card stock along the score line to create your card base. Add the basic white to the inside. Layer up the DSP to the Pear Pizzazz mat and add to the card front
Now for the decoration. You will need to create two of these, on for the box and one for the card.
Take a piece of the DSP and stamp a Pale Papaya and a pear pizzazz flower. Fussy cut.
Stamp the sentiment onto a scrap of basic white and cut out with the tailored tag Punch. Then cut a pear pizzazz and a gold metallic paper shape too. Cut these too horizontally and add to the top and bottom of the sentiment to create a nice border.
Glue the flowers behind the tailored tag sentiment section. Don't forget to make two clusters.
Add one to the card front and one to the box.
I hope you enjoyed my projects today, please take a look at the links below to check out what Donna & Karen have both created
Here's a list of supplies I used in today's project, click on the images to head over to my online store
Product List
 Specialty Designer Series Paper")


 Metallic Specialty Paper")


Do get in touch if you would like to see a copy of our Annual Catalogue, new Mini Catalogue and SAB Booklet - let me know if you would like me to get them or both in the post for you.

If you are on Facebook, why not pop over and check out our community group Craft & Banter. If you have a passion for paper craft, are brilliant at baking or a super talented seamstress then we would love to see you there. We share all types of crafting, run challenges and giveaways & generally have a right good natter.
See you soon
Vickie
Xxx


.png)
.png)
No comments:
Post a Comment