Sunday, 23 August 2020

Forever Greenery Birthday Card. Share it on a Sunday

 Good Morning Everyone.


Happy Sunday, It's that time again where Donna, Karen and Myself share a project each based around the same theme! This week the theme is Leaves. So I thought what better DSP to pull out than the Forever Greenery.


Measurements

Shaded Spruce Cardstock

1pc - 4 1/8" x 11 3/4", scored at 5 7/8"

1pc - 2" x 5 5/8"

Whisper White Cardstock

1pc - 5/58" x 3 7/8"

1pc - scrap for the sentiment

Forever Greenery DSP

1pc - 5 5/8" x 3 7/8"

1pc - 1 3/4" x 5 5/8"

3pc - 1 5/8" x 1 5/8"

Create your card base by folding the shaded spruce cardstock along the score line. Add the larger piece of whisper white to the inside and the largest piece of DSP to the card front.

Take the strip of DSP and layer it onto the strip of shaded spruce cardstock, then add to the card front.

Add the three squares of DSP to the right hand side with dimensionals, overlapping the strip slightly.

On a scrap of whisper white stamp the sentiment in shaded spruce and trim neatly. Adhere this to the centre of the middle square with liquid glue.


Here's the links so you can check out the projects from Donna and Karen

Taffy Crafting

https://taffycrafting.blogspot.com/2020/08/leaves-theme-card-as-inspired-stamping.html

Crafty Karen Designs

https://craftykarendesigns.blogspot.com/2020/08/share-it-on-sunday-all-about-leaves.html

Here's a list of all the supplies I used in today's card, click on the images to head over to my online store. Product List


Thanks for joining me today, please click follow or subscribe by email to be notified each time I post a new project. Also, be sure to sign up to my Newsletters. I send two per month, One with News & Updates and a second with a FREE Newsletter Subscriber Exclusive Project Tutorial.

Have a wonderful Sunday

See you soon

Vickie

xxx


Saturday, 22 August 2020

I Cherish you, My True Friend Ornate Garden Easel Fold Card. InspireINK Blog Hop August

 Good Morning Everyone,

Happy Saturday, I hope you are well. 


Today I am joining in with the InspireINK blog hop - where a lot of talented crafters are getting together to showcase Fancy Fold projects. So once you have taken a look at my project, be sure to click the link below to see what everyone else has made.

I have created an Easel Card using the Gorgeous Ornate Garden DSP.


Measurements

Bumblebee Cardstock

1pc - 11" x 4"

Old Olive Cardstock

1pc - 2 1/8" x 7/8"

1pc - 2 5/8" x 2 3/8"

1pc - 5 1/4" x 3 3/4"

1pc - 2" x 3 3/4"

1pc - 3" x 3 3/4"

Whisper White Cardstock

1pc - 2 1/8" x 2/3"

1pc - 3/4" x 2"

1pc - 2 1/2" x 3 5/8"

Ornate Garden DSP

1pc - 5" x 3 1/2"

1pc - 2 3/4" x 31/2"

1pc - 1 3/4" x 3 1/2"

First of all layer all the pieces of golden Ornate Garden DSP onto the coordinating sized Old Olive cardstock mat.

Next stamp the smaller sentiment onto the smallest piece of whisper white. Layer this onto the Old Olive cardstock mat and add to the smallest DSP layered piece.

Now, stamp the larger sentiment on the smallest of the remaining pieces of whisper white towards the top. Layer this onto the Old Olive cardstock mat and add to the centre of the largest panel of  Ornate Garden DSP. 

Take the Bumblebee Cardstock and score at 2 3/4" & 5 1/2". Fold the card in half along the 5 1/2", then open up the card and fold front the left towards the centre on the 2 3/4" score line and make sure you burnish both folds well. You will end up with a shape like this...


Hold the card in a portrait manner and add the two smaller panels to the base section, add the larger one with snail, then the smaller one with dimensionals. Stack two dimensionals on top of each other to give some height. This will hold the card in it's easel shape. Make sure you don't go too far up with them on the top edge, as the top panel will need a little room to sit.

Next, add the largest panel to the bottom section of the card, making sure you only add adhesive to the bottom half of the panel. Otherwise you will stick the card together and it won't stand up well.

Finally turn the card around and add the last piece of whisper white to the 'overhanging' section of the Old Olive Cardstock, this will give you somewhere to write a message.

Please be sure to continue Hopping through our projects...

You are invited to the Inlinkz link party!

Click here to enter

Here's a list of all the supplies I used in today's card. Click on the images to head over to my online store.


Product List

Thanks for joining us today, I hope you have found all our projects inspiring. Please click follow or subscribe by email to be notified each time I post a new project. Also, be sure to sign up to my Newsletters. I send two per month, One with News & Updates and a second with a FREE Newsletter Subscriber Exclusive Project Tutorial.

See you Soon

Vickie

xxx

Thursday, 20 August 2020

Gorgeous Posies Celebrating Your Day Greeting Card

 Good Afternoon Everyone,

Happy Thursday, hope you are all having a fab week so far - it's so very nearly the weekend!

Today I have a great card to share with you, using the Gorgeous Posies. It's an amazing stamp set and I have teamed it up with tonnes of Purple - what's not to love


Measurements

Blackberry Bliss Cardstock

1pc - 4 1/8" x 11 3/4", scored at 5 7/8"

scraps

Artistry in Bloom DSP

1pc - 5 5/8" x 3 7/8"

Whisper White Cardstock

1pc - 5 5/8" x 3 7/8"

1pc - 2 5/8" x 2 3/4"

1pc - 2 1/8" x 3/4"


Fold your Blackberry Bliss cardstock  along the score line to create your card base. Add the largest piece of whisper white to the inside, and the Artistry in Blooms DSP to the card front.

Take the larger piece of remaining whisper white and stamp the flower from in Highland heather, on a scrap stamp the image again and fussy cut. Place this piece directly above the other stamped flower to create a mask. Then ink up the leave in Granny Apple Green ink and stamp. Go onto the mask slightly, which will get both images rally close and give the illusion the the leaves are right behind the flower.  With Gorgeous Grape ink, add the circle cluster image to the flower centre.

Layer this onto a piece of Blackberry Bliss card stock and add to the card front towards the top, making sure you have an even border all the way round. Add three of the largest pearls to the centre of the flower.

Stamp the sentiment in Gorgeous grape ink and layer onto another piece of Blackberry Bliss cardstock. Add this to the card centrally, below the image.

Here's a list of all the supplies I used in today's card - click on the images to head over to my online store.

Product List


Thanks for joining me today, please click follow or subscribe by email to be notified each time I post a new project. Also be sure to sign up to my newsletter, I send two per month - one with News and Updates and a second with a FREE Exclusive Newsletter Subscriber Only Tutorial.


Have a wonderful Thursday,

See you soon

Vickie

xxx

Wednesday, 19 August 2020

Bloom & Grow You're Simply Wonderful Greeting Card

 Good Morning Everyone, 


I hope you are all fine and well. I'm hoping to get some serious craft time in this afternoon, what have you all got planned?

First, let me show you this gorgeous card I have made using a 'Sepia' colour palette and the Bloom & Grow Stamp Set.


Measurements

Crumb Cake Cardstock

1pc - 5 7/8" x 8 1/4, scored at 4 1/8"

Neutrals DSP Stack - Early Espresso

1pc - 5 5/8" x 3 7/8"

Very Vanilla Cardstock

1pc - 5 5/8" x 3 7/8"

1pc - 4 1/2" x 3 7/8"


On the smaller piece of Very Vanilla, stamp the floral image towards the top, then turn the image upside down and stamp towards the bottom. Add the sentiment to the centre - all using Early Espresso ink.

Now using your blends and markers, colour in the flowers.

Take the crumb cake cardstock and fold along the score line to create your card base. Add the plain very vanilla panel to the inside and the DSP to the card front.

Place the Stamped panel into the centre of the DSP - the top and bottom edges should line up flush with the DSP and you should have about 1/2" of DSP showing at either side.

This is a super simple card, and I love the Sepia look I created - but you could easily use the layout and created the card in a whole host of colour combos.

Here's a list of all the supplies I used in today's card, click on the images to head over to my online store.


Product List

Thanks for joining me today, please click follow or subscribe by email to be notified each time I post a new project. Also, be sure to sign up to my Newsletters - I send two per month one with News & Updates and a second with a FREE Exclusive Newsletter Subscriber only Project Tutorial.

Have a wonderful Wednesday,

See you soon

Vickie

xxx


Tuesday, 18 August 2020

Gilded Autumn Sending a Smile Your Way Greeting Card. #33sketches no12

 Good Morning Everyone, 

I hope you are well. It's a very wet and miserable morning so far here in Huddersfield. But you can't have it all!! 

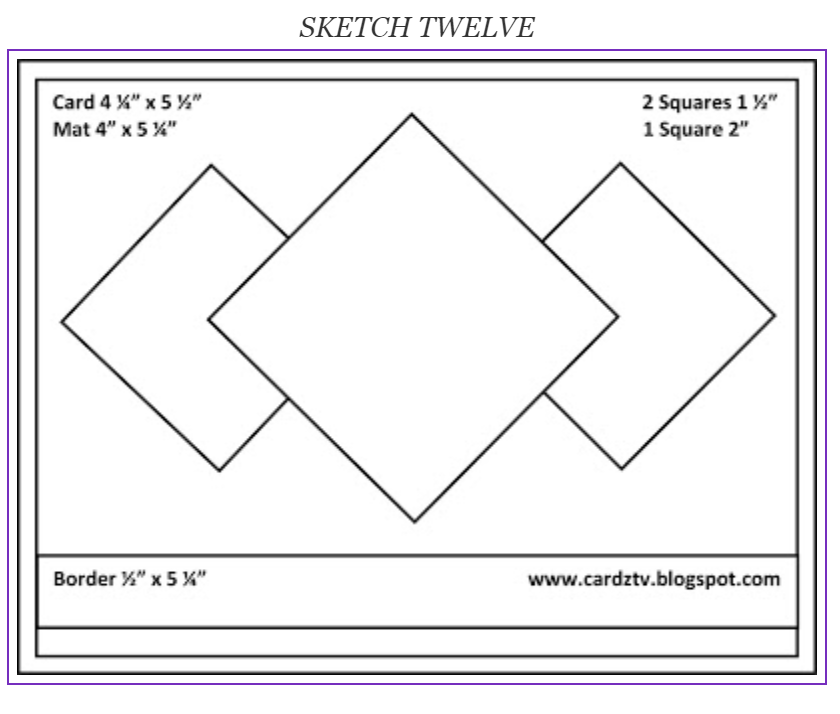
Today I have another card for you in my #33sketches series. For this one I used the beautiful Gilded Autumn DSP which has the most wonderful foiling detail.


Here's the sketch I followed, from cardstv.blogspot.com. 


Measurements

I have had to play around with the sizes slightly for it to work with International A4 Cardstock

Cajun Craze Cardstock

1pc - 5 7/8" x 8 1/4", scored at 4 1/8"

2pc - 1 5/8" x 1 5/8"

Very Vanilla Cardstock

1pc - 5 5/8" x 3 7/8"

Gilded Autumn DSP

1pc - 5 5/8" x 3 7/8"

1pc - 2" x 2"

2pc - 1 1/2" x 1 1/2"

Mint Macaron Cardstock

1pc - 5 5/8" x 1/2"

Early Espresso Cardstock

1pc - 2 1/8" x 2 1/8"

Create your card base by folding the Cajun Craze cardstock along the score line and add the Very Vanilla panel to the inside and the larger piece of Gilded Autumn DSP to the card front. 

Stamp the sentiment in the middle of the thin strip of Mint Macaron cardstock in Early Espresso ink and add the the card front, add this approx 1/4" from the bottom of the DSP.

Layer up the smaller squares of DSP to the cardstock square and arrange in a diamond pattern on the card front towards the top, above the sentiment strip. I glued down the two smaller ones with liquid glue, and added the larger one with dimensionals,

As super quick and easy card, letting the beautiful paper do the hard work for you!

Here's a list of all the supplies I used in today's card, click on the images to head over to my online store. Product List


Thanks for joining me today, please click follow or subscribe by email to be notified each time I post a new project. Also, be sure to sign up to my newsletter. I send two per month - one with mews & updates and a second with a FREE Newsletter Subscriber Exclusive Project Tutorial.


Have a wonderful day, 

see you soon

Vickie

xxx

Creative Colour Challenges - #CCC263

  Good Morning Everyone, I hope you are well. Welcome to the next Creative Colour Challenge. I love playing around with colour combinations ...