Monday, 7 February 2022

Boughs & Blossoms Thank You Card. Creative Colour Challenges #CCC23

 Good Morning Everyone

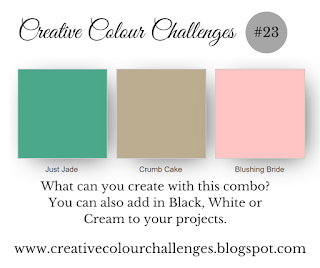
Happy Monday, We have a brand new Colour combination over on Creative Colour Challenges. It's Just Jade, Crumb Cake & Blushing Bride.

I think this combo is fabulous - such a soft palette to work with. I went for the Boughs & Blossoms stamp set as I thought it would just look lovely - What do you think?



Measurements

Just Jade Card Stock

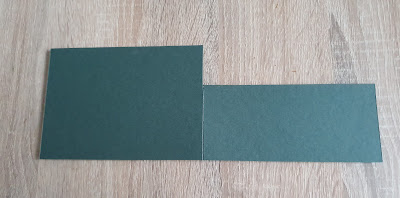
1pc - 4 1/8" x 11 3/4", scored at 5 7/8"

Crumb Cake Card Stock

1pc - scrap

Basic White Card Stock

1pc - 5 5/8" x 3 7/8"

scraps

------------------------------------

Take the Just Jade card stock and fold along the score line to create your card base and add the basic white piece to the inside.

Run the crumb cake scrap through your Stamp n Emboss Machine with the largest hexagon from Beautiful Shapes Dies. Ink the Edges of this with crumb cake ink.

On scraps of basic white stamp a selection of flowers, leaves and foliage in all three of the colours along with the Thank You sentiment. Fussy cut all these images as well as the wording - cutting the sentiment into two words.

Add the Hexagon to the card front in the middle towards the right. Adhere the wording to the Hexagon, again towards the right. 

Then using all your fussy cut flowers and leaves, build up a cluster around the left of the hexagon. Use both dimensionals and liquid glue to get lots of different height and depth.

It's a super easy card, and after the fussy cutting its so quick to put together and I think you could take the design and switch up the colours and sentiment to create a huge variety of different cards.

Please do head on over to Creative Colour Challenges and see what it's all about, and maybe even enter yourself.

Here's a list of supplies I used in today's project, click on the images to head over to my online store




Do get in touch if you would like to see a copy of our Annual Catalogue, new Mini Catalogue and SAB Booklet - let me know if you would like me to get them or both in the post for you.



If you are on Facebook, why not pop over and check out our community group Craft & Banter. If you have a passion for paper craft, are brilliant at baking or a super talented seamstress then we would love to see you there. We share all types of crafting, run challenges and giveaways & generally have a right good natter.

See you soon 

Vickie 

Xxx

Sunday, 6 February 2022

Daffodil Afternoon Happy Birthday Easel Card. Share it on a Sunday.

  Good Morning Everyone

Happy Sunday. Today we have a Share it on a Sunday for you and our theme is Florals. So i thought of what better DSP to use than the beautiful Daffodil Afternoon DSP, and this easel card shows it off beautifully. Oh, and it's FREE during Saleabration so another reason to love it more!! Haha


Measurements

Crushed Curry Card Stock

1pc - 4" x 11"

Basic Black Card Stock

1pc - 3 3/4" x 5 1/4"

1pc - 3 3/4" x 2"

1pc - 3 3/4" x 3"

scraps

Basic White Card Stock

1pc - 2 1/2" x3 3/4"

scraps

Daffodil Afternoon DSP

1pc - 3 1/2" x 5"

1pc - 3 1/2" x 1 3/4"

1pc - 3 1/2" x 2 3/4"

2 x Fussy Cut Daffodils

Silver Foil

1pc - scrap


First of all layer all the pieces of  DSP onto the coordinating sized Basic Black card stock mat.

Take the Crushed Curry card card stock and score at 2 3/4" & 5 1/2". Fold the card in half along the 5 1/2", then open up the card and fold front the left towards the centre on the 2 3/4" score line and make sure you burnish both folds well. 

Hold the card in a portrait manner and add the two smaller panels to the base section, add the larger one with liquid glue, then the smaller one with dimensionals. Stack two dimensionals on top of each other to give some height. This will hold the card in it's easel shape. Make sure you don't go too far up with them on the top edge, as the top panel will need a little room to sit.

Next, add the largest panel to the bottom section of the card, making sure you only add adhesive to the bottom half of the panel. Otherwise you will stick the card together and it won't stand up well.

Turn the card around and add the last piece of whisper white to the section of the Crushed Curry Card stock section showing, this will give you somewhere to write a message.

Stamp the sentiment in memento onto a scrap of basic white, then cut out using the postage label punch, also cut a basic black shape. Cut the basic black piece in half lengthways and add behind the sentiment using. Add this to the card front and the place the fussy cut daffodils around it.

I hope you have enjoyed today's card, please take some time to visit both Donna and Karen to see what they have made today.

Taffy Crafting

Crafty Karen Designs

Here'a a list of the supplies I used today, click on the images to head over to my website Product List


Do get in touch if you would like to see a copy of our Annual Catalogue, new Mini Catalogue and SAB Booklet - let me know if you would like me to get them or both in the post for you.


If you are on Facebook, why not pop over and check out our community group Craft & Banter. If you have a passion for paper craft, are brilliant at baking or a super talented seamstress then we would love to see you there. We share all types of crafting, run challenges and giveaways & generally have a right good natter.

See you soon 

Vickie 

Xxx

Saturday, 5 February 2022

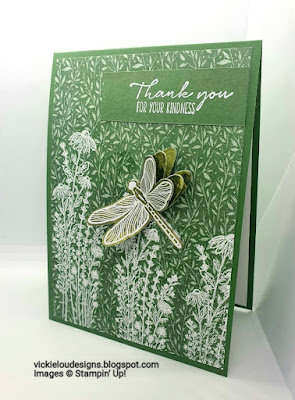
Dragonfly Garden Heat Embossed Thank You Card. Stamping with Friends Monochrome Blog Hop. February 2022

 Good Evening Everyone


Today I'm taking part in the Stamping with Friends blog hop and our theme is Monochrome. I decided on using Greens for my card and added in details with clear and white heat embossing.

I went with this gorgeous design from the Home & heart DSP and I thought it worked perfectly with the Dragonfly Garden bundle.


Measurements

Garden Green Card Stock 

1pc - 4 1/8" x 11 3/4", scored at 5 7/8"

scrap

Home & Heart DSP

1pc - 5 5/8" x 3 7/8"

Basic White Card Stock

1pc - 5 5/8" x 3 7/8"

Beauty of the Earth DSP

scraps

---------------------------------

Take the Garden Green Card stock and fold along the score line to create your card base, then add the basic white to the inside.

Ink up the tall flowers stamp in versamark ink a stamp it three times along the bottom of the DSP making the heights drop as you go to the right. Heat emboss with White embossing powder. Then ink up the stamp again in versamark and stamp in between the white embossing. Then Clear Heat emboss these ones. You can't really see it on my photo but it looks really lovely on the card. Add this panel to the card front.

On a scrap of Garden Green heat embossing the sentiment with White powder, trim and add to the card.

Stamp a Dragonfly in Versamark onto a scrap of Beauty of the Earth DSP, heat set and punch out. Also punch out 5 more dragonfly shapes. Stick two back to back so that they have green on both sides. The last one sticks to the back of the heat embossed one. Adhere all these together - just gluing all the bodies together, leaving the wings loose.

Add this to the card, once dry, open out the wings to get a really nice 3D feel.

I hope you enjoyed my card today, please continue through the hop as there will be lots of Monochrome inspiration. Angie is up next, so click the next button and head on over....


Roll Call
Linda Moore
Deb Schultz
Mickey Moore
Krissi Hannahs
Mo Rootes (UK)
Tricia Butts
Candi Suriano
Diane Evans
Melva Peters
Robbie Susan Chandler
Vickie Littlewood
Angie McKenzie
Helen Jennings
Karen Egan
Lorraine Tierney
Betty Bickford
Rachel Merrick

Caron Bailey


Do get in touch if you would like to see a copy of our Annual Catalogue, new Mini Catalogue and SAB Booklet - let me know if you would like me to get them or both in the post for you.


If you are on Facebook, why not pop over and check out our community group Craft & Banter. If you have a passion for paper craft, are brilliant at baking or a super talented seamstress then we would love to see you there. We share all types of crafting, run challenges and giveaways & generally have a right good natter.

See you soon 

Vickie 

Xxx

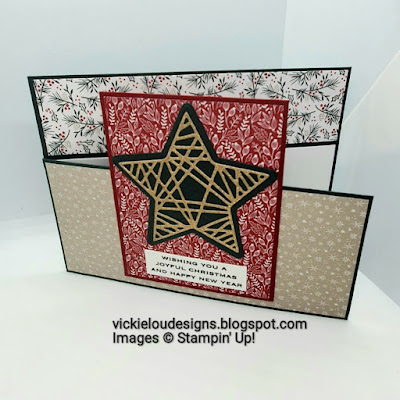
Tidings of Christmas Stable Door Christmas Card. Stampin' for Christmas Blog Hop. February 2022

 Good Afternoon Everyone

Today I'm taking part in the first Stampin for Christmas blog hop! Yes, you may say it's a little crazy as Christmas is not long behind us! But I try really hard to make Christmas cards throughout the year to ensure I have a nice Starter pile towards the end of the year. Joining in with this hop not only giving me a few more for the stash, but it also provides lots of inspiration!

I've used the Tidings of Christmas Suite from the Annual catalogue for my card today. It's a very simple Stable Door Fold but it looks pretty special with that detailed metallic star on the front.


Measurements

Evening Evergreen Card Stock

1pc - 4 1/8" x 11 3/4", scored at 5 7/8"

scrap

Cherry Cobbler Card Stock

1pc - 3" x 3 3/4"

Basic White Card Stock

1pc - 5 3/4" x 2 1/2"

scrap

Tiding of Christmas DSP

1pc - 2 1/2" x 5 3/4"

1pc - 3 5/8" x 2 7/8"

1pc - 1 3/8" x 5 3/4"

-------------------------------------------------

Take you piece of Evening evergreen card stock and fold along the score line. Cut off a 1 1/2" strip from the top of the card front, so you are left will a piece that looks like this...


Add the DSP panels to the card, adding the basic white piece behind the the 'door'.

Cut a star using the metallic paper with the detailed star die cut and layer it onto a solid evening evergreen star. Add this to the DSP and Cherry Cobbler card stock. 

Add glue to the back to the cherry Cobbler piece but only the bottom half, add this to the card front, making sure that you line it with the top and bottom of the back piece.

Please continue through the hop, and get some more inspiration. Marieke is up next - click the next button to head over to here blog.


FEBRUARY Blog Hop Roll Call


Carol Brown

Gez Carpenter

Nina King McMillan

Annette Elias

Victoria Littlewood

Marieke Bart

Helen Jennings


Do get in touch if you would like to see a copy of our Annual Catalogue, new Mini Catalogue and SAB Booklet - let me know if you would like me to get them or both in the post for you.


If you are on Facebook, why not pop over and check out our community group Craft & Banter. If you have a passion for paper craft, are brilliant at baking or a super talented seamstress then we would love to see you there. We share all types of crafting, run challenges and giveaways & generally have a right good natter.

See you soon 

Vickie 

Xxx

Simply Marbleous Sentimental Swirls Happy Birthday Card. Pootlers Hop February 2022

 Good Morning Everyone

Today I'm taking part in a special Pootlers Blog Hop. We are celebrating Sam Hammond Donald, our Upline and her amazing 1million CSV achievement with a blog hop specifically using the stamp set she helped to created.

The Sentimental Swirls stamp set is full of smaller elements which help you create simple designs but enable you to build more detailed designs, and also they can be used seamlessly with other sets in the Catalogues.


Measurements

Smoky Slate Card Stock 

1pc - 5 7/8" x 8 1/4", scored at 4 1/8"

1pc - 3 1/8" x 1 7/8"

Simply Marbleous DSP 

1pc - 5 5/8" x 3 7/8"

1pc - 3" x 1 3/4"

Scraps

----‐------------------------------------------------

Take the larger piece of DSP and stamp the swirls in Versamark, sprinkle with silver embossing powder and heat set.


Add this to the card base.

Next add the happy birthday and a swirl to the smaller piece. heat set again. layer this to the card front.

on scrap do a bird and a couple of small flowers. fussy cut these

lease head over and take a look at what everyone else has created

You are invited to the Inlinkz link party!

Click here to enter


Do get in touch if you would like to see a copy of our Annual Catalogue, new Mini Catalogue and SAB Booklet - let me know if you would like me to get them or both in the post for you.


If you are on Facebook, why not pop over and check out our community group Craft & Banter. If you have a passion for paper craft, are brilliant at baking or a super talented seamstress then we would love to see you there. We share all types of crafting, run challenges and giveaways & generally have a right good natter.

See you soon 

Vickie 

Xxx


Thursday, 3 February 2022

Shaded Summer Expressions in Ink Happy Birthday Gift Box and Card. Stampaversary Blog Hop

 Good Morning Everyone

I hope you are all well?

As you know, I'm a Stampin Up Demonstrator and my two closest Crafty Friends came from being a Demonstrator. Our paths would never have crossed if it weren't for Stampin Up and I'll be forever grateful for that. We do a lot together - as you may have seen our Share it on a Sunday Series, We all signed up in a February so  Donna, Karen and Myself have decided to come together again today a do a mini blog hop to celebrate our Stampaversary.

We set a challenge to create two projects - one card and one 3D using the Expressions in ink DSP for one and the Shaded Summer for the other. I slightly missed the brief and used both on both projects. But I think I've still managed a lovely project, so hopefully they will forgive me!! Haha.


Measurements

Pear Pizzazz Card Stock

1pc - 8" x 8"

1pc - 5 5/8" x 3 7/8"

scraps

Pale Papaya Card Stock

1pc - 4 1/8" x 11 3/4", scored at 5 7/8"

Gold Metallic Paper

scraps

Expressions in Ink DSP

1pc - 6" x 6"

1pc - 4 3/4" x 5 1/2"

scraps

--------------------------------

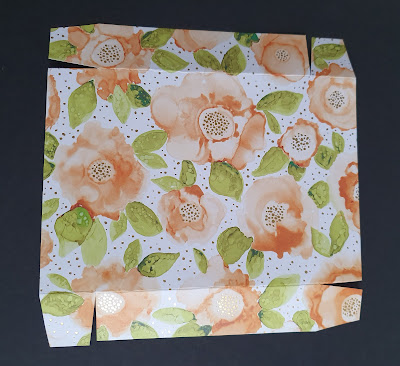
Take the square piece of Pear Pizzazz and score on all four sides at 2". Fold and burnish all the score lines and then snip away at the smaller corner squares to create tabs.  Hold the card stock and cut up the first score line at the bottom left, and notch in. Rotate your card 90degrees and do the same. Repeat this process for all the four corners. You will have a piece that looks like this.


Repeat this process with the DSP, but score at 1" on all four side. But when scoring pull the DSP a tiny bit away from the edge of your score board, it doesnt have to be much its like 1/16". But I find it easy to do it this way than faff with those small number when cutting card Stock. This process will just help the lid fit better


Add tear and tape to all the tabs, fold in to create the base and the lid. Pop to one side for now.

For the card, fold the Pale Papaya card stock along the score line to create your card base. Add the basic white to the inside. Layer up the DSP to the Pear Pizzazz mat and add to the card front

Now for the decoration. You will need to create two of these, on for the box and one for the card.

Take a piece of the DSP and stamp a Pale Papaya and a pear pizzazz flower. Fussy cut.

Stamp the sentiment onto a scrap of  basic white  and cut out with the tailored tag Punch. Then cut a pear pizzazz and a gold metallic paper shape too. Cut these too horizontally and add to the top and bottom of the sentiment to create a nice border. 

Glue the flowers behind the tailored tag sentiment section. Don't forget to make two clusters.

Add one to the card front and one to the box.

I hope you enjoyed my projects today, please take a look at the links below to check out what Donna & Karen have both created

Taffy Crafting

Crafty Karen Designs

Here's a list of supplies I used in today's project, click on the images to head over to my online store Product List


Do get in touch if you would like to see a copy of our Annual Catalogue, new Mini Catalogue and SAB Booklet - let me know if you would like me to get them or both in the post for you.


If you are on Facebook, why not pop over and check out our community group Craft & Banter. If you have a passion for paper craft, are brilliant at baking or a super talented seamstress then we would love to see you there. We share all types of crafting, run challenges and giveaways & generally have a right good natter.

See you soon 

Vickie 

Xxx

Framed Violets I Appreciate You Card. Touches of Ink Blog Hop. October 2026

  Good Evening Everyone, Today I'm hopping with the fabulous Touches of Ink Ladies. Each month we hop without a set theme, just the enco...