Thursday, 23 July 2020

Playful Pets Happy Birthday, Let's Celebrate You Card. #33sketches No.6

Good Morning Everyone,

Hope you are well.

Today I have another sketch for you in my #33sketches challenge. I'm really enjoying this series, it's really pushing me to create designs I wouldn't ordinarily choose.

I have decided to use the fun Playful Pets DSP today, I have focused on the Dog patterns, but you could easily switch this up to use the Cats.


This is the sketch I followed
Sketch from cardstv.blogspot.com 


Create your card base by folding the Early Espresso Cardstock along the score line and add the whisper white panel to the inside. Adhere the larger piece of DSP to the card front.

Place the strip of Early Espresso Cardstock along the centre of the card front.

Now, cut out two circles from the DSP using two of the circles fromthe Stitched shapes Dies. Stick down the largest one with liquid glue, then add the smaller one with dimensionals so it overlaps the larger one slightly.

On scraps. Stamp the sentiments from itty Bitty Birthdays stamp set in Early Espresso ink. These sentiments are in strips, so I cut them apart and then scattered them over the larger circle of DSP.

Measurements

Early Espresso Cardstock
1pc - 5 7/8" x 8 1/4", scored at 4 1/8"
1pc - 1" x 5 7/8"

Playful Pets DSP
1pc - 5 5/8" x 3 7/8"
2pc scraps for the circles

WhisperWhite Cardstock
1pc - 5 5/8" x 3 7/8"
Scraps for the sentiments


Here's a list of the supplies I used in today's card, click on the images to head over to my online store.

Product List
Thanks for joining me today, please click follow or subscribe by email to be notified each time I post a new project. Also, be sure to sign up to my newsletter. I send two a month, one with news and updates and a second one with an exclusive project tutorial for Newsletters Subscribers

Have a wonderful day,

See you soon

Vickie
Xxx

Wednesday, 22 July 2020

Fancy Phrases Sending a Smile Greeting Card. Pootles Team Swap

Good Afternoon Everyone,

Happy Wednesday! Hope you are all well and this week is treating you week?

Today I am sharing with you the card I made for a Team Swap and the beautiful cards I received. So  with the release of the new Annual Catalogue, all team members wanting to participate get put into groups and we create a card to send to four other demos.

This is the card I created for my swap, I used Fancy Phrases as I just adore the imagery and this fabulous sentiment was perfect for a swap card.


Measurement

Sahara Sand Cardstock
1pc - 5 7/8" x 8 1/4", scored at 4 1/8"

Whisper White Cardstock
2pc - 5 5/8" x 3 7/8"
scraps for sentiment and flower

Create your card base by folding the Sahara Sand Cardstock along the score line and add one of the Whisper white pieces to the inside.

Rub your embossing buddy over the remaining piece of Whisper white, then ink up the floral image with versamark ink and cover the piece. Next sprinkle over clear embossing powder so it sticks to the wet sticky versamark ink. Gently tap off an excess and then bring in your heat tool and melt the powder. Make sure you melt all the powder to a shiny smooth finish.

Once this has cooled, take a sponge and some Petal Pink ink and with circular motions cover the whole piece with the ink, building it up as you need. The ink will sit on the card where there is no embossed areas, and it will resist sitting on the shiny embossed sections. Gently and lightly, wipe over the piece of card to remove any of the ink that is on the embossing, this will make those areas look bright white.

Add this panel to the card front.

Now, stamp the floral image on a scrap of whisper white, this time in memento ink. once the black outlines have dried, colour in using a selection of Stampin Blends. I chose to fussy cut the image, but you can get dies, which would cut this out for you.

Add dimensionals to the back of the floral arrangement and add to the card front in the lower left side.

Finally stamp the sentiment in memento and add to the top right.


Just take a look at these fabulous cards I received.

Dagmar Mosler


Cas Shears
Storm Stamping


Angelina Clark
Intatwyne Designs


Hannah McClurley
Stampin By Hannah


Here's a list of the supplies I used in today's card, click on the images to head over to my online store.
Product List
Thanks for joining me today, please click follow or subscribe by email to be notified each time I post a new project. Also, be sure to sign up to my Newsletter. I send 2 per month. Once with news & Updates and a second with a FREE Exclusive Project Tutorial for Newsletter Subscribers.

Have a wonderful Wednesday

See you Soon

Vickie
xxx

Tuesday, 21 July 2020

Ornate Garden, For a Thoughtful Friend Greeting Card. #33sketches No5

Good Morning Everyone,

Thanks for stopping by today to take a look at sketch no5 of my #33sketches challenge.

I have to admit, I adore the Ornate Garden DSP is one of my absolute favourites of this catalogue.


This is the Sketch I followed:
Sketch from cardztv.blogspot.com


Measurements

Bumblebee
1pc - 5 7/8" x 8 1/4", scored at 4 1/8"
1pc - scrap for the sentiment

Early Espresso Cardstock
1pc - 5 5/8" x 3 7/8"

Whisper White Cardstock
1pc - 5 5/8" x 3 7/8"

Ornate Garden DSP
3pc - 1 5/8" x  3"

Fold the Bumblebee cardstock along to score line and add the whisper white piece to the inside and the early espresso to the card front.

Take the three pieces of DSP and arrange them on the card front positioning them towards the top. If you have a piece of DSP and you wish the design to continue through the three panels, first cut you length at 3", then cut 1 5/8" pieces, making sure when you adhere these down, that you take note of the pattern and make sure it follows across.

Stamp the sentiment from Gorgeous Posies in Early Espresso ink onto a scrap piece of Bumblebee cardstock and then ad the the bottom of the card front, making sure it is in the centre of that Early Espresso section.

Here's a list of the supplies I used in today's card, click on the images to head over to my online store.

Product List
Thanks for joining me today, please click follow or subscribe by email to be notified each time I post a new project. Also, be sure to sign up to my newsletter. I send two per month, one with news and updates and a second one with an exclusive project tutorial for Newsletters Subscribers.

Have a Fabulous day,

See you soon

Vickie
Xxx

Monday, 20 July 2020

Bonus Days are back!! Earn in July, Spend in August

Good Afternoon Everyone,

I hope you are well, and hope that Monday is treating you well so far! Just wanted to quickly remind you about the Bonus Days Offer that we currently have running throughout JUly.


Its a very simple promotion, for every £45 you spend (before shipping) in July you will receive a coupon code via email, with £4.50 to spend in August.

These codes are emailed to you after your order has been confirmed, and are only issued once - so please keep these in a safe place!

August sees in our new Mini Catalogue full of seasonal goodies, so it's a fab time to have those coupons to spend.

Just head over to my online store click here and start earning those code.

Feel free to contact me if you want anymore information.

See you Soon

Vickie
xxx

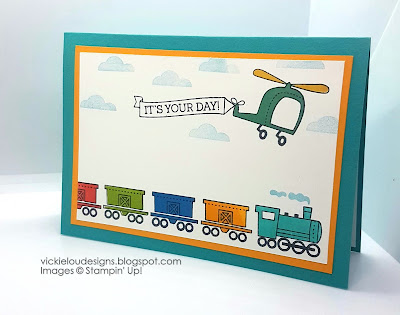
It's Your Day Moving Along Young Child's Greeting Card

Good Morning Everyone,

I hope you are well.

Today I wanted to share a card I made for a youngster... the Moving Along stamp set was a set I made myself to get as a challenge, it's not my usual type of stamp set to go for, but I actually love it!!


Measurements

Bermuda Bay Cardstock
1pc - 5 7/8" x 8 1/4", scored at 4 1/8"

Whisper White Cardstock
1pc - 5 5/8" x 3 7/8"
1pc - 3 3/8" x 5 1/8"

Mango Melody Cardstock
1pc - 5 5/8" x 3 7/8"

Take your Bermuda Bay Cardstock and fold along the score line and add the larger piece of whisper white to the inside and the Mango Melody to the card front.

Now, on the remaining  piece of whisper white start creating your picture. I stamped all the outlines and filled in with various bright colours. This stamp set makes building a scene so easy as you get an outline and a solid infill stamp to colour. It's brilliant.

Once you are happy with your picture, add this panel on top of the Mango Melody on the card front.

Here's a list of all the supplies I used in today's card, click on the images to head over to my online store.

Product List
Thanks for joining me today, please click follow or subscribe by email to be notified each time I post a new project. Also, be sure to sign up to my Newsletter. I send two per month, one with news and updates and a second with a FREE Newsletter Subscriber Exclusive Project Tutorial.

Have a wonderful day,

See you Soon

Vickie
xxx


Beautiful Gallery Thinking of You Card. Touches of Ink Hop. September 2025

  Good Afternoon Everyone, Today I'm hopping with the Fabulous Touches of Ink group. We hop each month and although we don't have a ...