Monday, 10 January 2022

In Symmetry Celebrate with Flowers Happy Birthday Card. Creative Colour Challenges #CCC19

 Good Morning Everyone

Happy Monday Ladies and Gents! Hope you all had a fabulous weekend.

There's a brand new colour combo over on Creative Colour Challenges. I think this combo is fabulous - I just love bright and bold so it really is right up my street.

I've used a really simply fun fold, the card front is slightly shorter, therefore you can see the Happy Birthday Sentiment whether the card is open or closed. I also used the In Symmetry  & Celebrate with Flowers stamp sets


Measurements

Old Olive Card Stock

1pc - 5 7/8" x 8 1/4", scored at 4 1/8"

So Saffron Card Stock

2pc - 3" x 5 3/4"

1pc - 7/8" x 5 3/4"

Basic White Card Stock

2pc - 2 7/8" x 5 5/8"

1pc - 3/4" x 5 5 /8"

---------------------------------------

Take the Old Olive card stock a fold along the score line to create a standard card base, then trim off 1" from the right hand side. Make sure you only cut this from the card front otherwise you will just end up with a shorter card!

On one of the larger pieces of basic white card stock Stamp the leaves and stem towards the bottom in the centre and add this to the coordinating piece of So Saffron and add the the shortened card front.

With the larger flower image, create a full round(ish) flower head by stamp them opposite each other in Magenta madness. Stamp the smaller circular flower image twice, once in magenta madness and once in so saffron. Fussy cut all these out, cutting just to centre out of the so saffron image. Layer all these pieces together. I would normally use some dimensionals, but I was aware that The card already had a few layer and this is to be posted, but you could build up more depth by adding the dimensionals behind each level if you would prefer.

Adhere this down onto the card front so it sits above the leaves at the top of the stem.

On the Thin piece of basic white, stamp the sentiment in Magenta Madness into the centre and then add a couple of flowers at the top and bottom in so saffron.  Add this to the So Saffron card stock strip and adhere to the card base towards the right hand side on the back panel - so it shows evenly and centrally when the card is closed. 

Add the remaining piece of basic white to the remaining So Saffron and add this to the inside of the card, behind the card front.

Finally, pop a rhinestone into the centre of the flower head.

Here's a list of supplies I used in today's project, click on the images to head over to my online store Product List


Thanks for joining me today, please make sure you sign up to my Newsletters - I send a Weekly Round Up so that you get to see all the projects I have made that week - plus I also send a Monthly email full of news and updates for the upcoming month.

Do get in touch if you would like to see a copy of our Annual Catalogue, new Mini Catalogue and SAB Booklet - let me know if you would like me to get them or both in the post for you.

If you are on Facebook, why not pop over and check out our community group Craft & Banter. If you have a passion for paper craft, are brilliant at baking or a super talented seamstress then we would love to see you there. We share all types of crafting, run challenges and giveaways & generally have a right good natter.

See you soon 

Vickie 

Xxx

Saturday, 8 January 2022

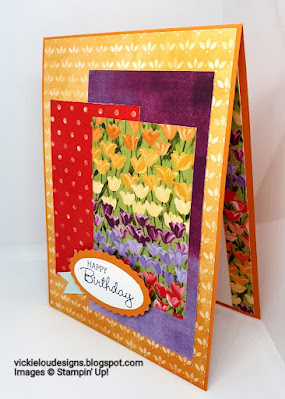
Flowering Fields Happy Birthday Card. Stamping with Friends Sketch Challenge Blog Hop. January 2022

 Good Evening Everyone

I am back again for another blog hop with the wonderful Stamping with Friends ladies. For our first hop of 2022, our theme is a sketch layout. I love to follow these as they help give guidance and really help me focus when creating and I love the one Linda chose. 

I've used the Flowering Fields DSP, but my main focus has been on the non floral aspects of the design - I had to add a small amount, but as you can see below the rest of the panels are of simple patterns and textured looks. Which I think works well when adding that small swatch of the tulips. 


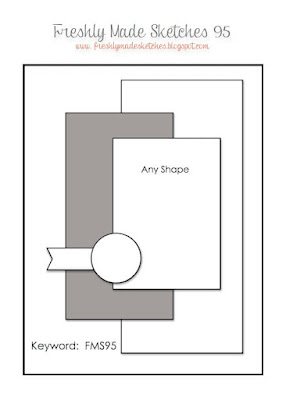
This is the sketch we were given to follow. As you can see I stayed pretty true to the original - just switching the circle for ovals and varying my proportions of DSP. That's what I love about a sketch - you have licence to play around as you wish depending on your mojo i suppose! 


Measurements

Pumpkin Pie Card Stock

1pc - 4 1/8" x 11 3/4", scored at 5 7/8"

1pc - scrap

Basic White Card Stock

1pc - 5 5/8" x 3 7/8"

1pc - scrap

Flowering Fields DSP

1pc - 4" x 5 3/4"

1pc - 1/2" x 5 7/8"

1pc - 4 3/4" x 2 1/2"

1pc - 3 3/4" x 2 1/4"

1pc - 3 1/4" x 2 1/8"

Supple Shimmer Paper

1pc - scrap

-----------------------------------------

Take the Pumpkin Pie and fold along the score line to create your card base. 

Adhere the thin 1/2" strip of DSP to the right hand side of the Basic White piece and add this to the inside of the card.

Arrange the four pieces of DSP onto the card front, following the sketch.

On a scrap of basic white stamp the sentiment from Pansy Patch in memento ink and cut out with the smooth oval from the Double oval punch, also cut a scalloped oval from pumpkin pie card stock. Layer these together and add to the card front with dimensionals.

Taking a small piece of supple shimmer paper approx 1/2" wide and cut banner tails in one end then add to the card front, tucking the straight edge under the sentiment layer.

It Really is a super quick card and a great way to show off several of the DSP patterns in one place.

I hope you enjoyed my card today, please take some time to continue through the hop and check out all the other Inspiration for using this same sketch layout. Kelly is up next, so click on the next button to head on over to her blog.....


Roll Call


Here's a list of supplies I used in today's project, click on the images to head over to my online store Product List


Thanks for joining me today, please make sure you sign up to my Newsletters - I send a Weekly Round Up so that you get to see all the projects I have made that week - plus I also send a Monthly email full of news and updates for the upcoming month.

Do get in touch if you would like to see a copy of our Annual Catalogue. I can also send out copies of the new Mini Catalogue and Sale a Bration Booklets - So let me know if you would like me to get one or both in the post for you.

If you are on Facebook, why not pop over and check out our community group Craft & Banter. If you have a passion for paper craft, are brilliant at baking or a super talented seamstress then we would love to see you there. We share all types of crafting, run challenges and giveaways & generally have a right good natter.

See you soon 

Vickie 

Xxx

Simply Marbleous Sweet Strawberry 2" Lidded Gift Box with Coordinating Birthday Note Card. Ink Stamp Share Showcase blog Hop. January 2022

  Good Afternoon Everyone

This is our first Ink Stamp Share hop of 2022, and it's the Showcase hope - which means anything goes.

I needed to make a gift box and a card for a friend whose birthday is coming up. I have her some really cute earrings, so decided to make a gift box and matching card to give to her. 

The supplies here are minimal, the design is straight forward and easy so, you can whip these up in no time. the Box measures 2" cube so you can fit a variety of things inside. so they would be great for many occasions.

The DSP I have used is called Simply Marbleous and you can get this FREE with a qualifying spend during Sale a Bration.


Measurements

Basic Gray Card Stock

1pc - 6x6" 

1pc - 8" x 4", scored at 4"

Basic White Card Stock

1pc - 3 7/8" x 3 7/8"

scraps

Simply Marbleous DSP

1pc - 4x4" 

1pc - 3 7/8" x 3 7/8"

-----------------------------------

Creating the Box

First take the 6x6" Basic Gray card stock and score at 2" on all four sides. Create tabs by cutting into the corner squares. Hold the card stock. Cut up the right hand score line, notch into both sides of this and the snip some of the length. Rotate card stock 90 degrees and repeat the cutting process, do this for all the four corners so you are left with your card looking like this.


Add tear and tape to all the flaps and adhere all the sides together to create the box base.

Now, take the 4x4" DSP and score at 1" on all four sides - edge the paper out from the left slightly, this will just help the lid for the base better . Cut the DSP to free the squares and notch in slightly. So it looks like this.


Add tear and tape to the tabs and fold in to create your lid.

On a scrap of basic white, stamp the strawberry outline in Real Red ink and the solid inside with Poppy Parade ink. also stamp the 'Hull' outline in Granny Apple Green and fill in with the same colour, but stamped of once first. Cut both these pieces out with the Strawberry builder punch and glue together. Attached this to the lid of the box using dimensionals.

Creating the Card

Fold the 8" x 4" basic gray card stock along the score line t create the card base, add the basic white piece to the inside and the DSP to the card front.

On as scrap of basic white stamp the sentiment in basic gray ink and trim, leaving a little extra on the right hand side. Layer this onto a scrap of basic gray card stock which is the same length and the white, but 1/4" taller to give you a border top and bottom. Add this to the card front, making sure the left edge is flush with the DSP layer below.

Finally, repeat the strawberry making process as above and add this to the end of the sentiment.

I hope you have enjoyed today's projects - please do continue through the hop and see what everyone else has been creating. Carol from The Stamping Ground is up next - click the button below to hop on over.....


Roll Call

Jo Blackman

Sue McDonald

Cindy Mitchell-Clark

Donna Coffman

Kim Price

Susan Simpson

Mo Rootes

Donna Lester

Karen Egan

Deb Naylor

Libby Fens

Gez Carpenter

Nicole Mahler

Tricia Butts

Jill Chapman

Annette Elias

Kirsty Pattrick

Victoria Littlewood

The Stamping Ground

Here's a list of supplies I used in today's project, click on the images to head over to my online store. Product List


Thanks for joining me today, please make sure you sign up to my Newsletters - I send a Weekly Round Up so that you get to see all the projects I have made that week - plus I also send a Monthly email full of news and updates for the upcoming month.

Do get in touch if you would like to see a copy of our Annual Catalogue, new Mini Catalogue and SAB Booklet - let me know if you would like me to get them or both in the post for you.

If you are on Facebook, why not pop over and check out our community group Craft & Banter. If you have a passion for paper craft, are brilliant at baking or a super talented seamstress then we would love to see you there. We share all types of crafting, run challenges and giveaways & generally have a right good natter.

See you soon 

Vickie 

Xxx

Sentimental Swirls Happy Birthday Card. Pootlers Team Blog Hop - New Mini Catalogue Showcase.

 Good Morning Everyone

Welcome to our Pootler's Team Hop where we are all showcasing the brand new Jan-Jun Catalogue.

I have chosen the Sentimental Swirls stamp set, a simple design and a dash of bold colours.  This Stamp set works perfectly for a clean and simple look and I absolutely love how the card turned out.


Measurements

Basic Black Card Stock

1pc - 5 7/8" x 8 1/4", scored at 4 1/8"

1pc- 3" x 2"

Basic White Card Stock

1pc - 5 5/8" x 3 7/8"

1pc - 2 7/8" x 1 7/8"

scraps

Artfully Composed DSP

1pc - 5 5/8" x 3 7/8"

-----------------------------------

Take the Basic Black Card Stock and fold along the score line to create your card base. 

Ink up the Swirl in Magenta Madness ink and add around the edges of the Artfully Composed DSP, using the smaller swirls to fill in some of the white space. Add this to the card front.

Stamp the sentiment, again in Magenta Madness ink onto the smaller basic white piece, layer onto the black mat and place into the centre of the card front.

On the Basic White piece, stamp the swirls into the right hand corner. Adding a small bird stamped with a black outline and a pacific point body. Adhere this panel to the inside of the card.

With the Memento black ink and some scraps stamp another bird and some of the small flowers. Infill the bird with Pacific point, and the flowers with Mango Melody & Highland Heather. Add these on mini dimensionals around the sentiment. 

Finally place one of the Iridescent Rhinestones of the centre of each flower. 

I hope you enjoyed my card today, Please take a look at the list below and continue hopping through to get lots more inspiration from our Jan-Jun Mini Catalogue

You are invited to the Inlinkz link party!

Click here to enter


Here's a list of supplies I used in today's project, click on the images to head over to my online store Product List


Thanks for joining me today, please make sure you sign up to my Newsletters - I send a Weekly Round Up so that you get to see all the projects I have made that week - plus I also send a Monthly email full of news and updates for the upcoming month.

Do get in touch if you would like to see a copy of our Annual Catalogue, Jan-Jun Mini Catalogue and the SAB Booklet -  Let me know if you would like me to get one or both in the post for you.

If you are on Facebook, why not pop over and check out our community group Craft & Banter. If you have a passion for paper craft, are brilliant at baking or a super talented seamstress then we would love to see you there. We share all types of crafting, run challenges and giveaways & generally have a right good natter.

See you soon 

Vickie 

Xxx

Creative Colour Challenges - #CCC252

  Good Morning Everyone, I hope you are well. Welcome to the next Creative Colour Challenge. I love playing around with colour combinations ...