Monday, 21 July 2025

Creative Colour Challenges - #CCC20

 Good Morning Everyone,

I run the Creative Colour Challenges blog. Each week three Stampin Up Colours are randomly selected and I ask you to create a projects using those colours! Some week's are easier than others - but what I do find is that there's a lot of inspiration given from those who participate, so I thought that on a Sunday, once I have announced the Winner of the Week's Challenge over on Creative Colour Challenges Blog, I'd hop on over here and share the entries with you in the hope that we can give everyone some more inspiration, and I will link to those I can (as anyone can enter, you don't have to have a blog or a website), so It's also my chance to share there work and show some support.


HEATHER FORGAN


DEBORAH WHEELER


JENNIE MAIER


RACHEL HARTL


I hope you will head over and take a look at the link provided and check out Jolanda's blog and all her amazing creations! 


If you are on Facebook, why not pop over and check out our community group Craft & Banter. If you have a passion for paper craft, are brilliant at baking or a super talented seamstress then we would love to see you there. We share all types of crafting, run challenges and giveaways & generally have a right good natter.

See you soon 

Vickie 

Xxx


Wednesday, 9 July 2025

Mixed Media Florals Happy Anniversary Double Z Fold Card. Touches of Ink July 2025 Blog Hop

 Today I'm blog hoping with the fantastic Touches of Ink ladies. Each month we hop with a focus on a suite or a bundle. This month - with it being the launch of our new Mini Catalogue there was plenty of choice!

I fell in love with the Mixed Media Florals Suite as soon as I saw it! The Images and sentiments along the designs and colour combinations of the DSP are fabulous - although I haven't used the DSP here

 A double Z Fold card was the perfect opportunity for me to use these fabulous Stamp sets, and show you how you can use these images to create your own 'DSP'


Measurements

Basic White Card  Stock 

1pc - 11" x 4 1/4", scored at 2 3/4" & 5 1/2"

1pc - 2 1/2" x 2 1/2"

1pc - 4 1/2" x 2 1/2"

1pc - 2 1/4" x 2 1/2"

scrap

Basic Black Card Stock

1pc - 10" x 2 3/4", scored at 4 3/4" & 7 1/2"


-------------------------------------

 Take the larger piece of Basic White and stamp the image all over using memento black ink - then score at 2 3/4" and 5 1/2"

Fold and burnish both the Stamped Basic White and the Basic Black card stock, making sure you create a Z shape ( fold in half and then back on itself).

Using the daisy image from that set, stamp it in memento all over the remaining three pieces of Basic White. Fill in some of the white space with the leaf image.

Now add all these stamped pieces to the Basic Black card strip.  

Adhere the smaller z fold to the larger one, the larger piece has the bigger back panel to the right, the smaller piece leads with the larger panel. Add liquid glue to the back of the smallest panel on the small z fold piece and adhere to the centre of the larger back panel.

Now, fold all the pieces down, don't worry some to the edges will overlap - then add adhesive to the front piece of the smaller z, making sure you only add adhesive to the section that will be stuck to the other piece, otherwise you will just make a mess and stick it all closed!!

Stamp the banner image and add the sentiment, both in memento then cut out using the coordinating die and your Cut & Emboss machine.

Take your Black Stampin' Write Marker and colour in the space between the outline of the banner and the edge of the dies cut. This just helps it stand out a little more like having a layer of Basic Black Behind it - with the fuss and extra cutting step.

I hope you have enjoyed my project today, please continue through the hop and get lots more inspiration from the Touches of Ink ladies. Head on over to see what Tatjana has created next.

ROLL CALL

  1. derdiedasKleine bastelt - Simone Kleine

  2. iriStempelt - Iris Philipps

  3. Jazzledazzlecraft with Janice - Janice Thomson

  4. VickieLouDesigns - Vickie Littlewood

  5. gittisgiftcorner - Tatjana Niederberger

  6. Stamp With Nellie - Heather Forgan

  7. Jungle Cards - Liane Gorny

  8. Stempelpapillon - Karina Ruppert

  9. Bastelbande - Gabi Appelt


Saturday, 5 July 2025

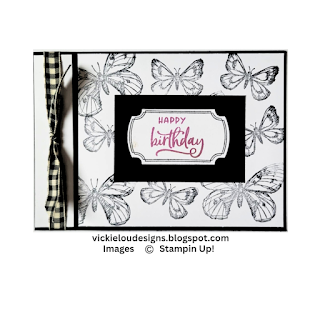
Labeled with Love Butterfly Bookbinding Card. The Project Share Project Blog Hop - July 2025 - CASE a Demo

 Good Morning Everyone,

Today I'm taking part in The Project Share Blog Hop. You may have seen that each week, us four crafty friends share each others projects on a Thursday - Well, on the first Saturday of the month we hop - creating a brand new project guided by a theme. This month's theme is 'CASE a fellow Project Share Demo'. 

I've decided to CASE Heather and her fabulous Bookbinding Fold card. I love this fold because it's a simple and easy fold, but adds that little bit more to your project. I Didn't have any black and white DSP so I decided to use the Butterflies to create my background.

What do you think?


Measurements

Basic Black Card Stock

1pc - 4 1/8" x 11 3/4"

1pc - 3" x 2"

Basic White Card Stock 

1pc - 5 3/4" x 4"

1pc - 4 3/4" x 4"

1pc - 7/8" x 4"

scrap

----------------------------------

Take the Basic Black cardstock and score at 5 3/4" and 6 3/4". Fold the cardstock in half as you would normally to create a card base, but then fold the front piece back on itself. 

Stamp a Butterfly in the lower right corner then add this to the inside of the card.

Add the thin piece of Basic White to the 'spine' Piece,  Wrap the ribbon around the thin piece securing on the back. Then  slip a length of ribbon under the secured ribbon and tie a knot I have added a glue dot under the knot to keep it in place and reasonably flat. 

Add some glue to the back of the 'spine' piece and adhere down - just this thin 1" section. The smaller piece glued down against the back piece creates the book bind element.

Stamp the two butterfly images all over the remaining piece of Basic White and then adhere to the remaining space on the card front.

I didn't have the embossing folder Heather used - so I took a 3" x 2" piece of basic white and scored it at 1/8" increments - this gave a flatter, but similar effect - add this this to the centre of the stamped panel.

On a scrap stamp the outline image in black and add Happy Birthday into the centre with Petunia Pop. Cut out using the coordinating die or punch and add to the scored panel.

I hope you have enjoyed my card today - I sure had fun creating it! It's a very simple card - but I think it looks great

Please take a few minutes to continue through the hop and check out what the very talented ladies have created today. Heather is up next, click the button below to visit her blog.


If you are on Facebook, why not pop over and check out our community group Craft & Banter. If you have a passion for paper craft, are brilliant at baking or a super talented seamstress then we would love to see you there. We share all types of crafting, run challenges and giveaways & generally have a right good natter.

See you soon 

Vickie 

Xxx


Friday, 4 July 2025

Just a Note Beautiful Gallery Inky Block Card. We Fall in Colour Blog Hop. July 20205

 Good Afternoon Everyone,

Today I'm taking part in the 'We Fall in Colours' Blog hop. 

As you know I love a good colour challenge, so this hop is perfect! 

Honestly, this combination had me stumped for a little while. But I decide to use a Stamping block of ink, this gives a fabulous textured effect behind my image.


Measurements

Basic Black Card Stock

1pc - 4 1/8" x 11 3/4", scored at 5 7/8"

Basic White Card Stock

2pc - 3 3/4" x 5 1/2"

---------------------------------------------

Take the Basic Black card stock and fold along the score line to create your card base - adding one of the Basic White Pieces to the inside.

Bring in a rectangular block, open the ink pads and add ink directly to the block - adding a thick layer. I started in the Middle with Petunia Pop, then Daffodil Delight to the top and Cajun Craze to the bottom. Spitz on a little water and tilt the block around a little go get the colours mixing a little where they join - I didn't want solid lines where the colours met.

Now, turn the block around and stamp it onto the remaining piece of Basic white. I stamped it over to the left, trying to get an even edges all the way around. Weight it down with something ( i popped a punch on the top) and try not to move it for about 10 minutes.

Gently remove the block and the majority of the ink should have transferred to the paper.

Ink up the Floral image from Beautiful Gallery Bundle and stamp over the coloured block. I felt that the lines were too thin, so I took my Black Stampin Write marker and using the brush tip, I went over all the black ink lines to get a thinker lined image.

Add the sentiment to the right of the coloured block, lining it up with the bottom edge.

Pop this onto the card front using liquid glue.

I hope you have enjoyed my card today - i LOVED creating it.

Please take a few minutes to continue through the hop - Simone is up next - please go over and say hello

ROLL CALL

derdiedasKleine bastelt - Simone Kleine 

iriStempelt - Iris Philipps

gittisgiftcorner - Tatjana Niederberger

stempelbande.de – Janine Krüger

Basteltime mit Petra - Petra Kurth

Vickieloudesigns - Vickie Littlewood


If you are on Facebook, why not pop over and check out our community group Craft & Banter. If you have a passion for paper craft, are brilliant at baking or a super talented seamstress then we would love to see you there. We share all types of crafting, run challenges and giveaways & generally have a right good natter.

See you soon 

Vickie 

Xxx


Thursday, 3 July 2025

The Project Share Project - 3rd July 2025

  Good Morning Everyone,

Happy Thursday and welcome to The Project Share Project. Every Thursday we will all share an individual blog post sharing one project from each of the other creators - maybe an inspiring card, a very fancy fun fold or simply a project that made us smile.


Verity Pursglove

Verity joined in with a video hop with the theme 'Patterns' and she absolutely nailed it. Using the Stripes & Dots stamp and the emboss resist technique she made an awesome background for these fabulous cards.
Click on the link which will take you to the blog post for more details.


-----------------------------------------------------------------------

Heather Forgan

Heather has created these gorgeous cards for a team swap using the Layered Thoughts stamp set and the Floral Impressions DSP. The design and layout is very simple - but clearly done to make sure you can batch make a tonne of these with ease, but compromising in the finish. Such a fabulous set of card. Head over to Heather's blog for all the details 


------------------------------------------------------------------

Craft with Jayne

Finally we have Jayne, who has created these little gift bags with the Perfectly Pairs Suite. I love the colours in this suite! How cute are they? Head over to her blog for more details


I really do hope you have enjoyed this post today. I enjoyed taking a closer look at these ladies' project and picking a favourite to share with you! If you have a moment or two, please head on over to their blogs. Check out these projects and see what else they have created too.


If you are on Facebook, why not pop over and check out our community group Craft & Banter. If you have a passion for paper craft, are brilliant at baking or a super talented seamstress then we would love to see you there. We share all types of crafting, run challenges and giveaways & generally have a right good natter.

See you soon 

Vickie 

Xxx


Creative Colour Challenges - #CCC20

  Good Morning Everyone, I run the Creative Colour Challenges blog. Each week three Stampin Up Colours are randomly selected and I ask you t...